Saturday, 15 April 2017

Seven Hills Crafts Monthly Card Challenge April + CASology Week 244

I'm here to share a card I made for two challenges, one is a Sketch over at Seven Hills Crafts


and the other is CASology, where the cue card this week is Strong

 
Here's my card...


I like to be as inventive as I can when it comes to making cards for challenges, so I bypassed my new Stay Strong stamp from Sugar Pea and instead found this older set called Teddybears Picnic and made this rather quirky scene. Hope it doesn't make you too scared to get your blanket out, but I rather think the ants are being friendly and wanting to join in :)

I started by marking out where the three diagonal lines would be for the Sketch in pencil onto a white card base. I then took one of the ants and inked him up with Memento Tuxedo Black and repeatedly marched him up the three lines. I spaced them out so that I could then take the picnic elements and make it look like they were being carried by the ants.


I then stamped the other images on some Neenah card stock and coloured them with Copic markers, before stamping the blanket onto some scrap patterned paper and fussy cutting them all.

I glued the picnic blanket into place, and placed the little girl and the teddies on top with foam pads. I stamped the sentiment on the bottom corner and my card is complete.


Did you know that ants can carry up to 50 times their own bodyweight? I think that makes them pretty strong indeed!

Here is a list of the supplies used on this card. I have signed up to affiliate links on some products. If you purchase any item after clicking on an affiliate link, I will receive a small commission at no extra cost to you. This helps in a small way to support the running of my blog and is very much appreciated, thank you! 


Thank you for popping along and I hope you all feel strong - especially if you're having a good Easter weekend :)

Flower Challenge #7 - Reminder

How time flies! We are already half way through this month's Flower Challenge #7, which is our very first sketch.


Here's my take on the sketch:


My main image on this card is actually all hand drawn. I've been inspired by watching Kim Dellow's You Tube videos - her Art Slices. She did one recently where she drew a pattern on a piece of paper and it was so mesmerising to see it come together I felt inspired to try myself.

I took a piece of Neenah 110lb card stock and drew lines on it at half inch intervals in pencil and then took my Copic multiliner and started adding in details in pen. I then coloured in a diamond with some Copic markers:


I die cut out the diamond shape with two of my Simon Says Stamp double stitched square dies. I cut a strip of lavender cardstock and added some stitched details along the edge with my Reverse Confetti dies. It was then simple to put together with some foam tape. A sentiment along the bottom with my Many Mini Messages set and then some enamel accents was all that was needed.


Here is a list of the supplies used on this card. I have signed up to affiliate links on some products. If you purchase any item after clicking on an affiliate link, I will receive a small commission at no extra cost to you. This helps in a small way to support the running of my blog and is very much appreciated, thank you! 


You have until 25th to link up your card on the blog. If you're doing this via Instagram, if you use the hastag #theflowerchallengeblog we will be able to find you. Happy crafting!

Thursday, 6 April 2017

Happy Auntie Rachel Day feat. Darnell's Boo Boo Hop

April 6th will forever be designated Auntie Rachel Day. We had plans as it's the Easter Holidays right now to spend the day with my sister and go to IKEA for meatballs and a wander around for ideas (craft room mostly!). My little ones kept asking when we were seeing Auntie Rachel and I kept replying that Thursday was Rachel Day, and it rather blossomed from there!

Of course a celebration requires a card so I decided to try my hand at a magic slider for the occasion. I've made one before and decided I was confident enough to try again and with some 'improvements'. Read on and you will understand why I'm entering it into Darnell's April Fool's Day My Big Fat Card Boo Boo/NBUS #11 Challenge. It wasn't intended to be an entry for that - I had an NBUS I was going to enter instead, but this card just evolved into a bit of a Boo Boo and I decided it had to be photographed after the first fluff!


So it doesn't look too bad does it? But there are parts of it which tore my hair out. If you've never made one before, I'll spare you the details and suggest a quick look on You Tube. I watched Kristina Werner's video, although she used some dies you can buy from Simon Says Stamp.

I don't have any Staz-on ink so I used Versafine Onyx Black and heat embossed my image from Lawn Fawn with clear embossing powder onto some heat resistant acetate that I found in my stash and had hardly used.

So I was doing well, I had stamped onto acetate, stamped onto my Copic cardstock and coloured and done some paper piecing. I made an aperture to fold over my card stock and added the acetate piece to this. It was going a bit too well. I decided then to add a bit of dimension when I folded the card over the top of the coloured piece and cut thin strips of foam tape and added them to the sides and to the bottom.

I then made the cut at the top before I folded it over so I could add in my white card pull tab. I placed it into the cut at the top and checked that it slid easily in and out. Then I smartly thought I'd add some foam tape to the bottom of the pull tab to stop it pulling out at the top. Instead I added it on the FRONT so you could see it when you pulled it up. Cue some delicate peeling back the end and placing the tape on the back.


Neat, isnt it? And then I decided to check it moved smoothly. Here I have a video so you can really appreciate the squeak you get when I moves up and down....


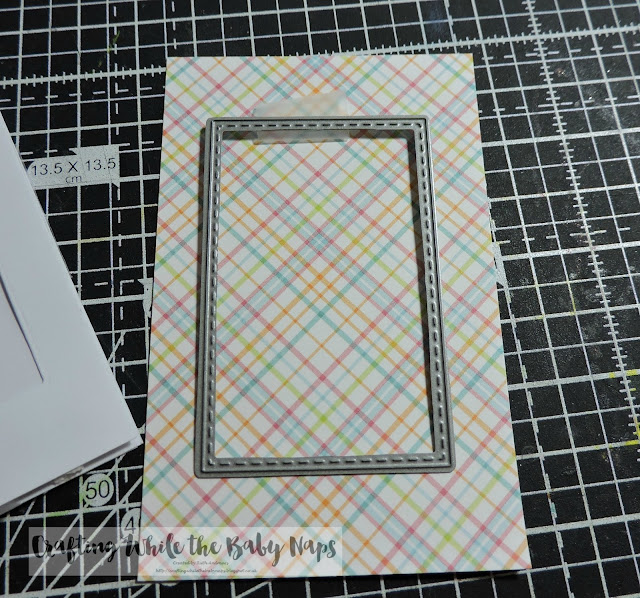
And then I decided I didn't like the white surround, so I wanted to add some colour from a paper pad around it. Can you guess what is wrong with this picture?


Yes, that's going to cut, isn't it? So it was late now and I was getting cranky, but I fixed the problem, used my stencil and some distress inks on the front of a white A2 card base and I stopped there.

The following morning I decided I would just run with it, added Pull to the top of the tab, stuck it onto the card base and wondered where I would put the sentiment and realised I didn't have time to hand stamp individual letters and stick them at the side so went with the following:


The light in the garden this morning at 9am wasn't great, but you can see I stamped Happy (discontinued Clearly Besotted set) and wrote the rest by hand.

I have to say, she LOVED it and was really happy, so it was all worth it!


Here is a list of most of the supplies used on this card. I have signed up to affiliate links on some products. If you purchase any item after clicking on an affiliate link, I will receive a small commission at no extra cost to you. This helps in a small way to support the running of my blog and is very much appreciated, thank you! 


So I'm entering it into the following challenges, and I hope they all have a sense of humour :)


Pixie's Snippets Playground Weeks 275 and 276 - The paperpiecing was done with snippets! 

So thank you all for making it this far and I hope you feel inspired to share your Boo Boos for the challenge - there are some really funny stories out there!

Tuesday, 4 April 2017

Flower Challenge #7

Wow! You went all out for the last challenge - let me tell you, 177 entries? Thank you so much! I hope you'll be just as inspired with this month's challenge which is our very first sketch. 

Flower Challenge #7 - Sketch

And here's the sketch in question:
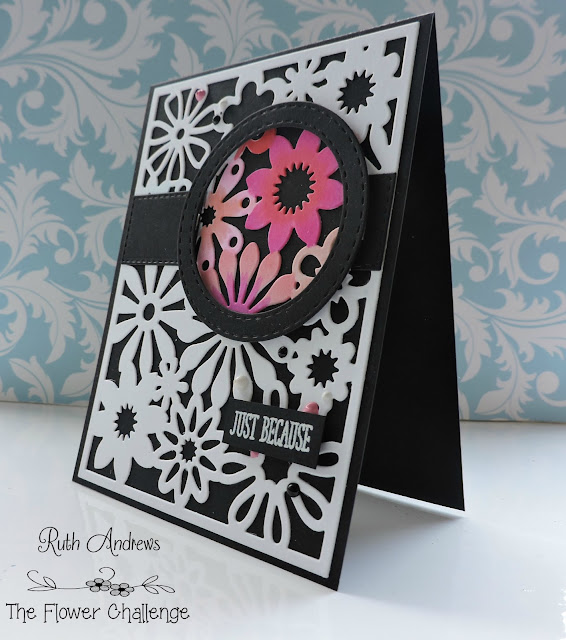
And here's my card 


I'd started getting all used to photographing outside my new craft room as the sunshine has been so great, but just as I was getting ready to take photos, the Heavens opened and it poured. Back inside and apologies they are a little dull.

Anyway, I started by taking some of my new MFT cardstock in Black Licorice and making an A2 (US sized) card base. I then die cut the MFT Floral Fusion card panel from Neenah 110lb card.  I coloured in a circle shape in pink Copics on the front and adhered it to the card base. 


I then surrounded the coloured area with a die cut circle with my SSS Stitched Circle dies, to represent the circle element on the card. I then die cut a small rectangle with my Memory Box stitched rectangle dies and cut it to fit around the circle.

I stamped the sentiment from my CB Many Mini Messages set in Versa Mark and heat embossed it in WOW! Bright White and mounted it on the card front with foam tape. Some strategically placed enamel dots in pink, white and black finished it off nicely.

Here is a list of the supplies used on this card. I have signed up to affiliate links on some products (currently only Simon Says Stamp). If you purchase any item after clicking on an affiliate link, I will receive a small commission at no extra cost to you. This helps in a small way to support the running of my blog and is very much appreciated, thank you! 


I really hope you'll take the time to play along. Remember you have until 25th to enter, so plenty of time to get your thinking caps on.


Thank you for popping by today, and I hope you have a great rest of the week :)

Blog design by aleelilydesigns