Hello again, fellow craft fanatics! Been a bit hectic this week, as I actually went out twice and one of them was dinner with a friend - amazing! Good to catch up there, and I've managed to catch up with my Copic class thanks to super sleeping baby.
This week it's all about adding shading with grey markers. I had to order a couple more markers and some additional ink to refill one, and I still think I could do with a couple more as this will prove to be a useful technique. It will take some practice to get the combination of which grey goes with which marker. I also discovered through doing this, that I don't like how my reds blend (R32 and R35), so I'll be checking out some others which may work more to my liking.
Anyway, onto the cards I made:
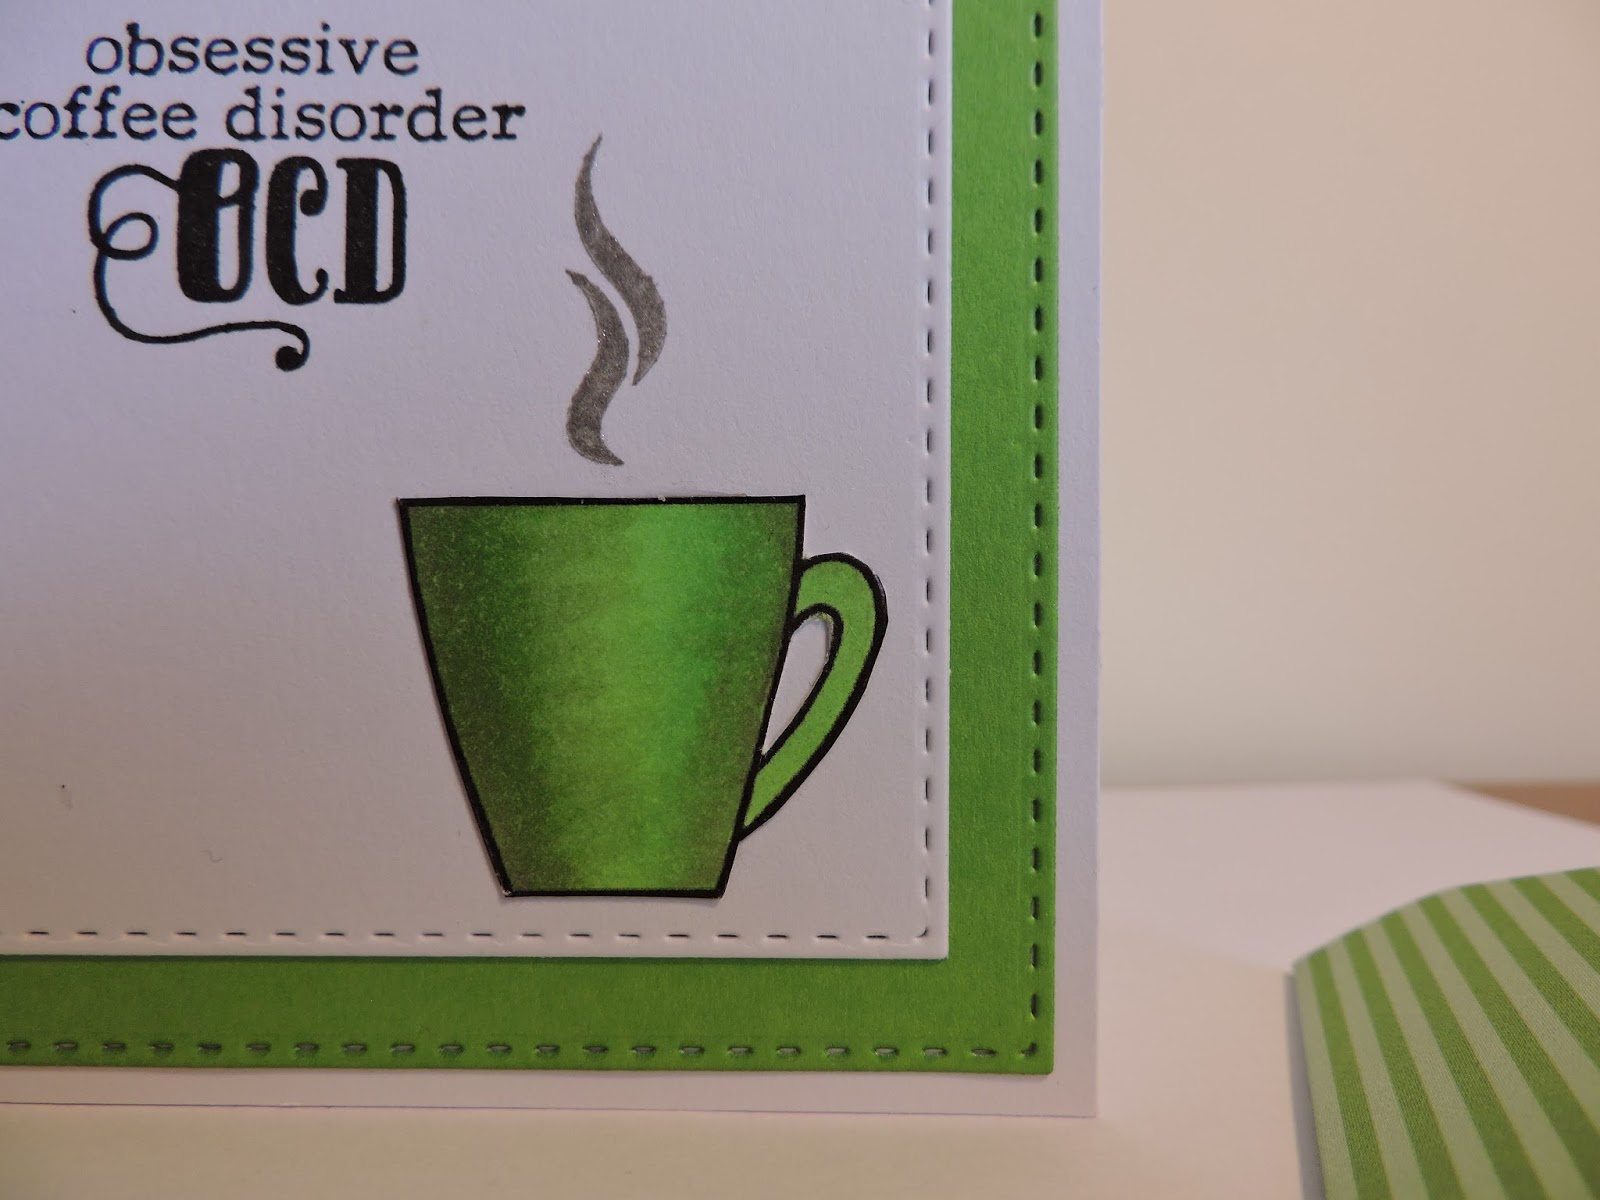
Really simple little 3.5 x 3.5 cards, which I like making as they don't take much time and use up scraps I seem to have acquired a lot of. I can also make envelopes for them using a 6x6 sized piece of card - I tried with some of my Lawn Fawn papers too and it worked really well (it's the stripy envelope!).
They are made exactly the same way by cutting out my practice images (the mug) and adhering it to a piece of white card stock. 3 were die cut with my SSS stitched squares (first use!!) and one the corners were rounded with my new WRMK Corner Chomper (I found a card blank with the corners rounded in my scrap tray so just used it!). I added the sentiment from the latest CB release stamps with VersaFine Onyx Black and the steam in Smokey Grey, adding a bit of Wink of Stella on top. This was then adhered to a piece of coloured card stock I had die cut with the SSS stitched squares (or rounded the corner in one) and attached to the card blank. Seriously simple, but I love them!
Some other piccies:
I do like the use of W5 in the right hand purple mug - it gives it quite a bit of depth (I think at least!!).
And I really love the greens - I'm having a bit of a green and purple phase aren't I....
A couple of close ups:
[Supplies: Clearly Besotted Warm Solutions II; Practice images from Online Card Classes; Copic Ciao Markers - various colours; Tombow Mono Multi Liquid Glue; Double Sided tape; Scrap card; Hobbycraft Premium White Cardstock 300gsm; WRMK Envelope Punchboard; WRMK Corner Chomper; Simon Says Stamp Stitched Squares; Stick It! Permanent adhesive roller; VersaFine Onyx Black and Smokey Grey; Wink of Stella]
I did like this technique, and I think it will give greater mileage to my small, but growing collection.
Thank you so much for reading. Hope you've had a good week and don't forget to pop over to see the lovely Aileen to check out how she got on with her Day 3 class. If you're visiting from her blog, thank you so much - been nice to have some new readers. Do leave me a hello in the comments :)
Hello - Again! Friday seems to come round with increasing alacrity these days - or maybe I'm just getting old....
So I've been playing around with my beloved Inktense pencils again. As part of the 30 Day Colouring Challenge, I finally did a swatch of all 72 one evening (see Instagram!) and while doing so, I realised there were some colours I'd never used, so I decided to use them...
These cards started out as late birthday cards and morphed into New Home shaker cards - it was one of those evenings!!!
I started out by colouring in the snail from Newton's Nook In Slow Motion using a range of different Inktense pencils. This always takes a while and I love that I can colour in bits of it, go away, come back and do some more. It's a slow build up of layers, leaving each of them to try in between.
Once I'd fussy cut them out, that's when I totally went off tack and started die cutting bits of Bazzill card I had that matched the snail - lucky! I then remembered my Sugar Pea Designs 'Home' die and decided that would be great for some paper piecing, and so that's what I did on the background. If I'd thought about it first, I'd have used some Stick It!, but I found that a couple of bits of double sided tape on the back worked really well for popping in the die cut piece and even those tiny hearts and windows in the opposite colour.

So, once the background piece was stuck onto my card blank, I added a piece of acetate to the back of the frame and a whole pile of foam pads round the outside. It's fiddly because they are so small, but I like the height of them and that they can be placed into any shape - easier for round apertures I find. I then took a couple of my favourite shaker sequin selections (who am I kidding, I love them all!!), French Lavender and Phosphorescence and placed them on top of the word Home, then the frame around it - this works much better for me than placing the sequins into the frame and plonking the card on top - it always ends up squint. I then just added the snail to the corner with some Tombow liguid glue.
Isn't he cute?? Seriously, I never thought a snail could be so cute!
[Supplies: Newton's Nook In Slow Motion; SugarPea Designs Home; Derwent Inktense Pencils 72 set; Derwent Small tip waterbrush; Ranger Archival Ink Jet Black; Bazzill Basics 12x12 Papers; Simon Says Stamp Stitched Rectangles; Little Things from Lucy's Cards - French Lavender and Phosphorescence; Tombow Mono Multi Liquid Glue; Foam pads; Hobbycraft A4 Premium White Cardstock 300gsm; EK Success Powder Tool]
I do love a shaker and the colours are so wacky!
Thanks for joining me again. Will be back with more Copic colouring next week. In the mean time, thanks for all your lovely comments and have a great weekend :)
Hello again everyone. Another week has started and somehow we still seem to have sunshine around us in West Yorkshire - trust me, this doesn't happen often!
It's time for another Copic class. Today's lesson was all about blending tricks, with techniques such as tip to tip blending, acetate blending and feathering. I found tip to tip quite tricky, but I wonder if that's because although it helps with blending dissimilar colours, mine are too dissimilar? I definitely found blending on acetate and Kathy's feathering technique much more effective.
I had a bit of fun making up some very odd colours of bird, and I loved colouring in the butterflies:
The purple and yellow butterfly in the bottom right corner had to be made into a card. I had too much fun colouring it in along with Kathy Racoosin's video. I had a card to make for my husband's aunt's birthday, so I decided to make one with the butterfly and also try my hand at using my newly purchased distress inks as well.
This was a surprisingly simple card to make. I stamped the flourishes (Clearly Besotted Mr & Mrs) and the sentiment (Mama Elephant Birthday Wishes) in Versa Mark ink onto a piece of white card and embossed using WOW! Bright White embossing powder. I then did some ink blending over the embossed areas with Mustard Seed and a hint of Spiced Marmalade. I love these inks! How have I waited so long to try them? I need to practice more and get some nice blues.
I attached the panel to the card blank and then cut out the butterfly and attached it by the body alone to the card using some glossy accents. I then decided the card needed some sequins, so used some of my Lemon Sherbet shaker selection sequins.
[Supplies: Clearly Besotted Mr & Mrs; Mama Elephant Birthday Wishes; Versa Mark ink; Wow! Bright White Embossing Powder; Heat Tool; EK Success Powder Tool; Little Things from Lucy's Cards - Lemon Sherbet; Copic Markers; Copic Markers for Card Classes practice sheets - Online Card Classes; Ranger Glossy Accents; Ranger Multi Medium Matte; Hobbycraft Premium White Card 300gsm; Double Sided Tape]
Simple and very effective I think - and it got a definite thumbs up from my husband!
Don't forget to pop over and see what Aileen, my Copic class buddy in Oz, has been up to with her Day 2 of the class. If you've popped over from her, Hello! and thank you for visiting :)
Thank you for your visits, and for all your lovely comments. They always make me smile. Hope the rest of your week is as fun as it can be.
Hello, fellow Craftaholics! Can you believe I've made some Christmas cards? Me who never considers Christmas until after her birthday at the end of November? Well, issue 142 of Simply Cards and Papercraft landed on the doormat and as soon as I saw the stamps I had to ink them up (see Instagram for pictures!). It's taken me a couple of days to get round to finishing the cards, but here they are:
That snow globe was crying out to be a shaker card, and so that's what I made!
For the snowman card, I stamped the snow globe onto some white card using Versafine Onyx Black ink - it's my new pad, so I'm trying it out lots! I then cut a rectangle out around it using my Memory Box stitched rectangle dies. I then cut out the centre of the snow globe with a craft knife - if you have circle dies, check them first to see if they fit - definitely makes it easier.
I covered the aperture with acetate and surrounded it on the back with foam pads. I then used my powder tool on the acetate to stop the sequins from sticking, put the last of my Glacier sequins in and attached a piece of watercolour paper that I'd previously made (see Instagram again!) to the back to secure it all in place. I then adhered it to an A2 card base which I'd covered with some Lawn Fawn Let's Bokeh paper. I glued the snowman into place and added the sentiment to the top - I also added a bit of Wink of Stella to the snowman, the snow globe and the sentiment - a bit? I.e. A lot!

For the other snow globe, I did much the same with creating the shaker section. I used two thicknesses of fun foam rather than foam pads, and used another of the stamps to create a background to the snow globe and added in a whole load of Pretty Pink Posh Clear Sparkling sequins that I won in Lydia Evans' giveaway. They are lovely sequins! I like how it covers the 'Let It Snow' and when you tip the card up, it reveals it.
[Supplies: Simply Cards and Papercraft Issue 142; Hobbycraft Premium White A4 Card 300gsm; VersaFine Onyx Black; Craft knife; Memory Box Stitched Rectangles Dies; Foam Pads; Fun Foam; Little Things from Lucy's Cards - Glacier Shaker Selection; Double Sided Tape; Sticky Red Tape; Pretty Pink Posh Clear Sparkling Sequins; Lawn Fawn Let's Bokeh in the Snow Paper Pad; Glitz Black and White Paper Pad; Wink of Stella Brush Pen; Wink of Stella 8mm Tip Pen; Caran D'Ache Metallic Pencils]
I then attached it to an A6 card base that I covered in some patterned paper I won in Liz McGuire's giveaway. I have won a lot of giveaways lately!!!
For the price of a magazine, this has fantastic stamps and there's even an embossing folder. I have a huge number of Christmas stamps now, it's unlikely I will need many more ever.
Thank you so much for taking the time to read my ramblings. Also a huge hello to all of you who popped over to see me from Aileen's blog, Colour and Sparkle and from Liz's blog as well, I've really appreciated it. Look out for more Copic colouring next week. I haven't coloured for a couple of days and I have been missing it!
Hi there, Craft buddies! I'm back with a super quick post to tell you how much fun I'm having doing the Online Card Class for Copic Markers. If you've ever thought about taking one of these classes, don't hesitate. On day 1 alone, it is worth the money already. For $35 (£20) you get lifetime access to fantastic videos and a whole host of instruction and practice sheets.
Here's the cards I made from some of the images on the first practice sheet. Today was all about blending.
I don't have a huge amount of markers yet, so I used what I had in the natural blending groups as well as Jennifer McGuire's tip of playing with a dark and light colour to see what works. The yellow and green balloons were done with colours outside of the natural blending groups and I love them - G17 and YR06; Y11 and Y06. The presents were coloured in with the same green, with the yellow this time Y06 and Y08.
I fussy cut out the balloons and presents and adhered them to a panel of white card I'd die cut using a Lawn Fawn Stitched Square. I attached it with fun foam to a 6x6 card blank I'd covered in Lawn Fawn Let's Polka paper. The '2' was stamped in Lemon Twist and Lily Pad using my new Paper Smooches Digits stamps that I won in a Giveaway over on Instagram (thanks to the lovely Lydia Evans!). I die cut them out using a small stitched square and adhered them using some foam pads.
[Supplies: Practice Sheet from Online Card Classes for Copic Markers; Copic Markers; Ranger Dye Ink Lemon Twist and Lily Pad; Lawn Fawn Let's Polka 6x6 Paper Pad; Lawn Fawn Large Stitched Squares; Double Sided Tape; Fun Foam; Sticky Red Tape; Stick It Permanent Adhesive Roller; Paper Smooches Digits]
Simple and bright for twins with an upcoming birthday :)
Don't forget to stop by my crafty friend Aileen over at Colour and Sparkle who is doing the class along with me - we'll be posting what we've done around the same time at opposite ends of the world - hopefully!!
Thanks for stopping by and I hope you're having a fun week. Hectic here as always, but managing to fit in colouring as and when I can :)
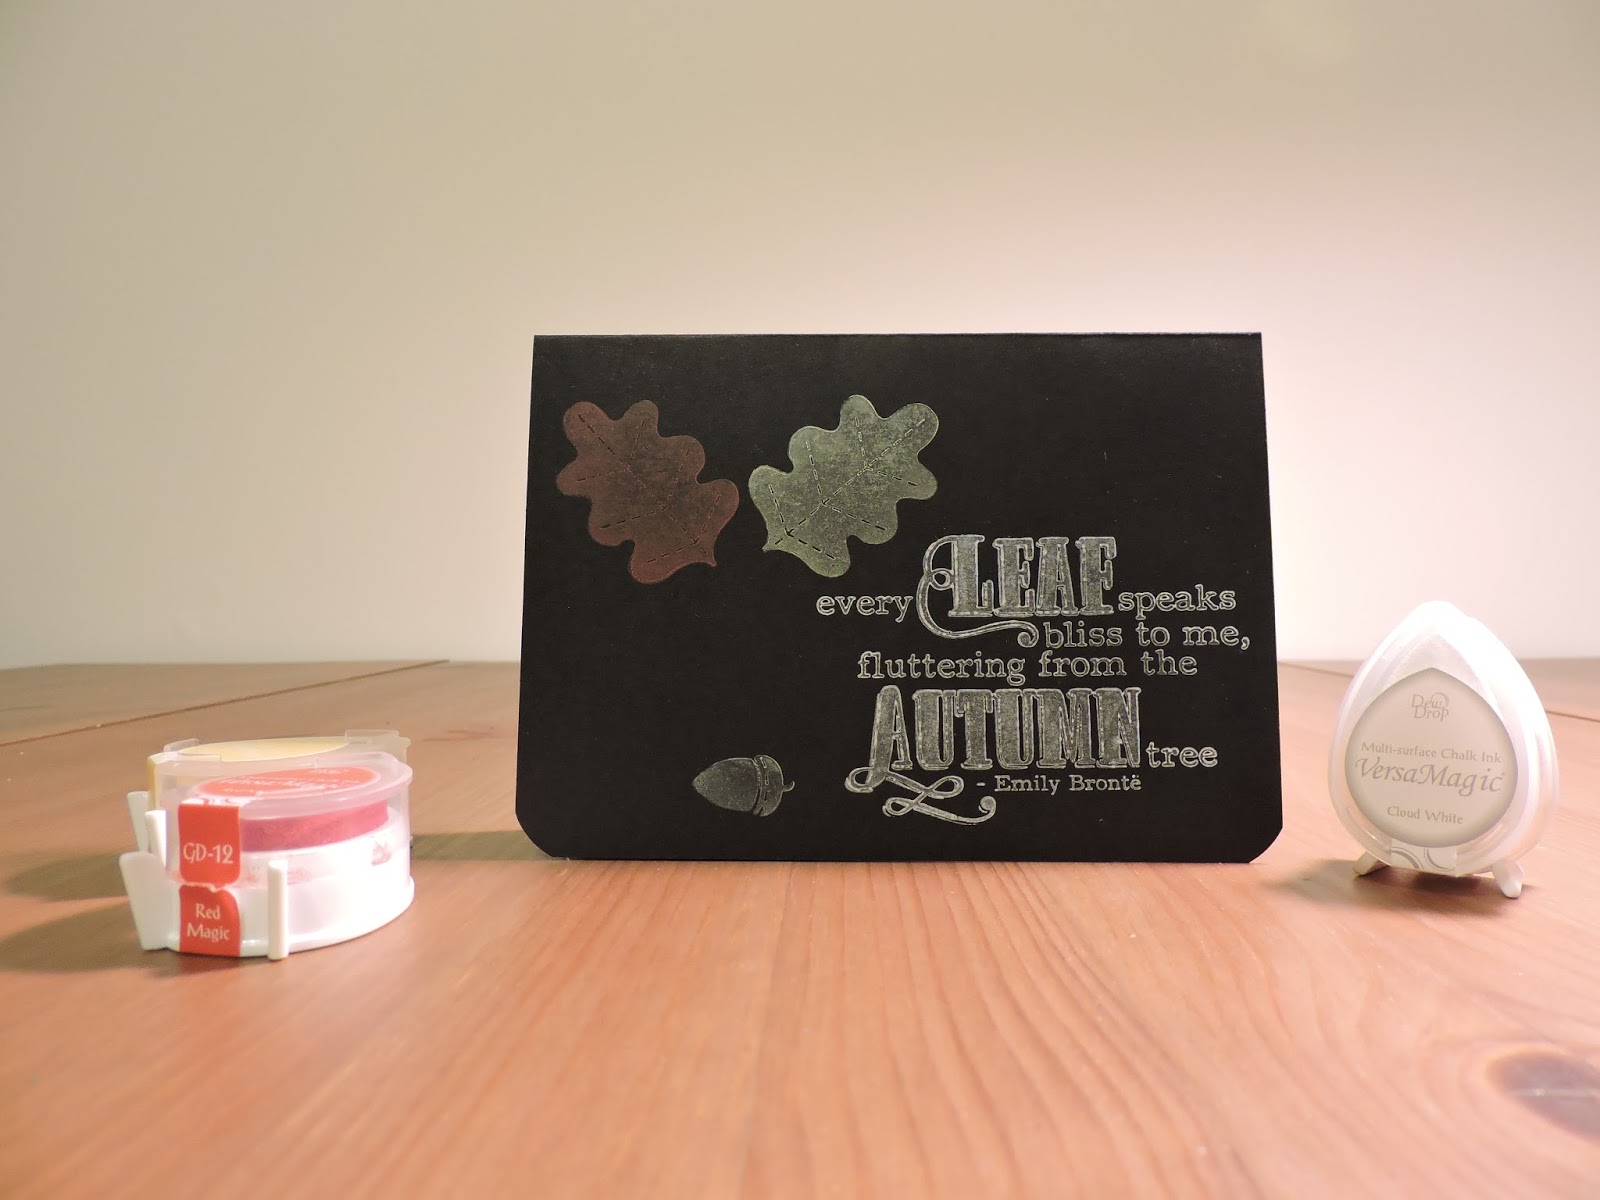
Morning Crafty Colouring People - and other interested readers! Well it's back to normal here in Yorkshire. Wild, wet and windy. Finally feels a bit like Autumn here, so I took the opportunity to play around with the other stamp set I got from September's Clearly Besotted release. Don't forget, tonight's the night - my alarm is set for 10pm and my little finger will be hovering. Michelle will have a release video later on today, so you'll get a real flavour of them before you buy.
So for my first couple of cards I tried using a black background - I think the results are interesting...
With my first, I used my Versa Magic inks that I rediscovered. I love them, but I'm not sure they are great on such a dark background. The white isn't as crisp and clean as I'd like it to be.
With my second I tried heat embossing and it definitely stands out much more - my husband preferred this one!
And for my final card, I cracked out my Zig Clean Color Real Brush Markers, which if you've read this blog for a while, or followed me on Instagram, you know I'm not that keen on. I'm still not that keen on them, but they will be handy to have and play around with every now and again.
I took some watercolour card and heat embossed the sentiment onto it, then played around with three of the colours - was hoping they'd be brighter, but it was quite subtle.
When it was dry, I simply cut it out with my Memory Box stitched rectangle die and adhered it to a white card blank, adding some sequins and sparkles from Lucy's Cards.
[Supplies: Clearly Besotted In Stitches: Autumn; Black cardstock; VersaMagic Dew Drops - Cloud White, Red Magic, Thatched Straw, Hint of Pesto;Versa Mark Ink Pad; WOW! Bright White and Clear Embossing Powder; WOW! Gold Embossing Glitter; Heat Tool; Zig Clean Color Real Brush Markers; Tim Holtz Watercolor Cardstock; Little Things from Lucy's Cards - Gilded Rose; Memory Box Stitched Rectangle; Double Sided Tape; Hobbycraft Premium A4 Cardstock 300gsm]
And in other news, I discovered through Liz McGuire that I was Star Letter in the latest issue of Papercraft Essentials (issue 125). I wrote to them after my post on those Mini Christmas Milk Cartons, because I wanted to pass on how much I loved it and because I get quite a bit of information and advice from magazines. I hadn't heard back from them and pretty much forgotten about it. Apparently there is a prize to go with it of some crafty things...... It would explain why I had quite a lot of hits on my blog the other week - way more than usual!!
So I hope you're all having a go at the 30 Day Colouring Challenge and I'll be back later in the week with how I get on with my Copic Class.
Thank you all so much for reading and all the wonderful comments you leave - I love this crafty place!
Hello again, fellow colourists! I hope you're all well and if you're in the UK enjoying a bit of an Indian summer - glorious sunshine for the past three days!
So of course, the excitement for October is that the third 30 Day Colouring Challenge has started. Instagram is where you want to be to see what others are up to. I hope you all might have a little play with whatever colouring medium you have handy.
I'm also excitedly waiting for the next release from Clearly Besotted, my favourite stamp company. This month's release is HUGE. I doubt I will refrain from purchasing even just a little tiny stamp set.....
I finally played around with my sets from last month's release and because they are solid images, they have made me look at doing more one layer cards. First up is Warm Solutions, which I purchased with a friend in mind who loves tea. As per last week's post, I went a bit crazy and made 4 cards, this time from scraps of white card I found in my scrap basket - feels good to have used those up!
Simple as possible with the bottom two, just stamping using my Ranger inks and rounding the corners. Made a little envelope for one, but need more card stock for the other one. They are very odd sizes because they were scrap card!
I then decided to try some masking and make a card with a tower of tea cups - had to use as many colours as possible! I took a card blank and covered it with some of my new Lawn Fawn Let's Polka in the Dark paper pad. My word, I love it! I cut out the tea cup panel with one of my SSS Stitched Rectangles and simply added it on top.
For the last card I rediscovered my Versa Magic inks. I haven't used these in ages, and I don't know why. I absolutely love them, so I am determined to get some more colours. Again I used my SSS Stitched Rectangles and LF paper pad.
[Supplies: Clearly Besotted Warm Solutions Stamp Set; Various Ranger Dye Inks; Versa Magic Perfect Plumeria; Simon Says Stamp Stitched Rectangles; Lawn Fawn Let's Polka in the Dark 6x6 Paper Pad; Hobbycraft Premium White Card Stock 300gsm; Bazzill 12x12 paper; WRMK Envelope Punch Board; Double sided tape; Sticky Red tape]
I'm linking up my tea cup tower card to the new Simon Says Stamp Wednesday Challenge as it's Anything Goes and they are show casing CB stamps - awesome!
I start my Copic class next week, so I shall update you with that in the coming weeks. I treated myself to some new ones to add to my colour combinations and have had a bit of a play.
Thank you so much for reading, and for all your lovely comments. Have a great weekend when it appears, and don't forget to do some colouring if you can :)