Running a small business has left me with little time for card making of late - you can see my last blog post was way back in June - but at the end of September I took the time to go to another of Faye's colouring classes as it gives me the opportunity to a) get out of the house on my own; b) colour in peace and quiet and c) learn from an expert. I'll share my colouring when I've finished them off and made a card from the images!
I took some of my hard earned cash from my Etsy shop and made the most of Dies to Die For being there by having a good rummage. I decided upon two stamp sets for Christmas cards. I've been feeling a need to colour some Christmas cards and get a bit ahead of myself. Plus Lisa told me she's already made 20 so I know I need to catch up!! Lol!
I love Stamping Bella images and this polar bear is just adorable. I decided to try a technique I did a couple of years ago after watching Elaine Hughes' video on how to colour the Northern Lights. You can tell I need a lot of practice, but I really enjoyed myself with my markers. I'm getting to that stage where I need refills now though!
I started with the bear and stamped him out onto some Make It Colour! card and coloured him in with E41, 42 and 43 with R81, 83, 85 and a bit of RV34 for his scar. I love that I can use the colouring on the stamp packet for inspiration. Oh and the picture has bleached out the colouring I did for a shadow to ground him. He isn't just floating I promise you!
I then decided to cut him out for some reason. Don't you love how cards evolve? I didn't really need to!
But anyway, I took another piece of Make It Colour! card and got colouring. It took me a fair amount of time to get anywhere near a decent blend and it still looks fairly messy to me, but I cut it to the size of a C6 card and stuck it on. I then trimmed the bear piece to fit on the bottom and popped him up on foam pads - well actually, it was the left over bits around a pack of foam circles. Always reusing and not wasting!
I feel pretty good I was inspired to try this again. It had been a long day on a school trip with 60 eight year olds (they were all excellent) and my brain needed something creative to do just not sewing....
Happy World Card Making Day! Hoping to get inspired to do some more very soon so I'm not rushing in November like always. Happy Crafting Everyone!
Hello! I was so excited to reach 100 sales in my Etsy shop that I've decided to have a giveaway! You and a friend could win £15 EACH - because I believe in sharing good fortune.
All you have to do is enter on my Bagageddon Instagram and follow the instructions on the post :)
If you don't win, don't worry, look out for a site wide sale to carry on the celebrations next week!
Hello crafty friends! What's this, I hear you in amazement, it's a card!
I popped along to my local craft club on Wednesday night with some stamps, some Copic paper and some Copics and this was the result. A Stamping Bella fairy in funky colours - well I did take an odd range of colours with me! - on a very plain background. Just some stencilling with a Uniko butterfly stencil and squeezed lemonade Distress Oxide put on with an ink duster so it wasn't too heavily coloured. She's been fussy cut and popped up on foam pads.
It felt good to colour again and actually blogging too!
Things in life are a bit more back on track again after illnesses with the children and a bout of depression for me.
The Etsy shop has had me busy, and I just hit 100 sales the other day, which is a goal I've been dreaming of for a very long time. Initially it was my aim to get there by December, but I managed it 6 months before that. What's surprised me is that my biggest seller has been my sets of reusable wipes and small coin purses to put them in. I've been learning as much as I can about making reusable products and more of these will be added to the shop over the coming year. I've also had a request for wholesaling some of my items, and I will share details soon :)
Thank you so much for all your support and for reading as usual. Happy Crafting Everyone!
Hello! I'm back again today with more from Hunky Dory. This time I chose a block of card stock - Ink Me! 6" x 6" Essential Card Block - and a packet of toppers - Watercolour Wings Topper Deck. Toppers are not something I would naturally choose, as I am more of a stamp and colour girl, but I like to try new things and thought it would be good to have something different to review.
I tried several things with the Ink Me! card block. I really like the size as I can cut it down to size for a standard US A2 or UK C5 card blank without too much wastage. It is also a nice thickness and very smooth, so I tried both ink blending and some Copic colouring:
1. Ink Blending with Distress Inks and Distress Oxides with Stencils
I had a play around with various distress inks and oxides and a couple of stencils. They were really easy to use with both a blending tool and my ink duster. I used some stencils from my stash from Funky Fossil Designs and Clearly Besotted Stamps and they worked really well. The ink went on nicely, didn't smear and I blended two colours together easily. I used Spun Sugar on one and managed to build up layers easily to get a darker colour.
I now have several of these pretty butterfly bride to make up into cards - perfect for birthdays, weddings, engagements. I do love a good stencil session!
2. Toppers and a card
Part of the reason I got the topper pack was because I loved the designs. I am a huge fan of owls and when I saw the watercolour designs, I thought they could be used for lots of different projects - and even be cut out - I do love a bit of fussy cutting.
On this card, I took a card blank from my stash (a C5) and cut the stencilled background I'd made from the previous stencil session (birch tree background) down to size to fit. I adhered it with some double sided tape. As I already had my distress inks out, I decided to do something I rarely ever do, distress ink the edges. I thought this went so well, I inked up the edges of my card blank as well. I then attached the topper onto the background with some foam pads. Easy as pie and I really like the outcome.
The toppers are also a really nice quality card, the designs very pleasing on the eye - watercolouring being quite the thing at the moment - and they can be easily made up into cards.
I used my own card blanks, but Hunky Dory also have a range you can use to make your final cards with:
https://www.hunkydorycrafts.co.uk/papercraft/card-making-supplies/card-blanks.html
3. Copic Colouring
I do a lot of Copic colouring and use speciality cardstock for it, but I always like to try any new card, especially if it's nice and smooth, which the Ink Me! is. I wouldn't recommend it solely for Copic Colouring, but I managed a decent blend on this Stamping Bella image without much bleeding, which I find can get with Neenah, the alternative I sometimes use. I definitely wouldn't dismiss it for the Copics, for quick colouring, if you have it to hand.
A thank you to Hunky Dory Crafts for having me and for giving me the products to review. None of my links are affiliates and my views on the products are entirely my own. I hope you've found this useful, and if you have any questions, please leave me a comment or drop me an email.
Hello! Things have been quiet on here for a few weeks, haven't they? Etsy got busy, Easter holidays happened and small children got sick and took quite a long time to get better, all of which impacted on my blogging. But....... I have an exciting blog post today..... read on....
A few weeks ago a very nice lady from Hunky Dory contacted me about doing a review of some of their products for them. I've heard of them, and indeed seen them on Create and Craft and had a very fixed idea of what they did. Card stock and toppers is what I had marked them down as. Before I said yes or no, though, I had a good root around their website Hunky Dory Crafts and imagine my surprise when I saw they also sell fabric and sewing notions as well as card stock, stamps, paper, toppers, pens.... So I said yes, picked my items and I'm here today to show you what I managed to do with 3 fat quarters and a glue stick...

So let's talk about those fat quarters. I use a lot of fabric in my Etsy shop, Bagageddon and I was very pleased with the quality of these. I have used fabric from the Craft Cotton Co. before and sometimes it can be a little hard even after washing. This was lovely from the start and washed up beautifully. You should always wash your fabric before using it to minimise future shrinkage. I also find that blues and reds can bleed quite a lot on the first wash, so this also helps, although with these there was no issue at all. I chose these for the beautiful Japanese style patterns which complement each other nicely, making them very easy to use for mixing and matching.
The fat quarters I chose were:
Kimono by Stuart Hillard - Fat Quarter - Waves (navy)
Kimono by Stuart Hillard - Fat Quarter - Abstract Flower (cobalt)
Kimono by Stuart Hillard - Fat Quarter - Dragonfly (white)
You can also buy this fabric in metre lengths, and I think it's a good price for a metre of nice quality cotton (£2.50 a fat quarter, so £10 a metre), given you can pay up to £15 a metre these days.
So what did I make? You really can get a lot out of fat quarters for lots of small projects. Here's my list and I have half of it left for more. I haven't given instructions on how to make them as that would take too long, but there are many easy to follow guides on YouTube.
1. A set of reusable make up remover wipes and a small drawstring bag to keep them in. You can easily get 6 sets of these out of 2 fat quarters. They are 2.5 inches each and backed with cotton or bamboo terry. A really great way to get into zero waste items. You can use old towels for this project too.
2. Two glasses cases - one slightly wider than the other to accommodate larger sunglasses. These are padded with fusible fleece and use two different fabrics. One for the lining and one for the outer. I use around half a fat quarter for each one.
3. A lavender eye bag - I discovered these at yoga and wanted to make some myself. Here's a picture of me down in my sewing basement using it. This uses about a quarter/third of a fat quarter with a muslin bag inside filled with lavender.
Throughout my sewing, I used the Stix2 Fabric Glue Pen. It's a washable pen that keeps your fabric together while you sew. It was really easy to use, not really sticky and I liked that it was pink so that I could see where I had put it. I used it on most of my initial sewing and was impressed at how well it kept the fabric flat, even when sewing the terry towelling for my wipes. That's a big win for me as pins and sometimes clips can even ruck the fabric slightly. I had absolutely no problems sewing with it - no residual stickiness or issues of any kind.
It comes with a refill which is good as I did use quite a lot of it. I found it a useful tool to have in my arsenal. Not something I would use entirely instead of pins and clips, but something to have for smaller projects where clips can overwhelm the project. I will be doing some more research - particularly with zips as they can be a big nightmare, and also stretch projects. I can definitely see it as being very useful for applique as it keeps fabric flat for sewing.
It's a definite thumbs up from me for both of these items. The fabric for the quality and quirky patterns. The glue stick for a useful addition to my sewing notions.
I hope you found this useful and if you have any more questions, please leave me a note in the comments or send me an email. I will be back tomorrow with more, this time with paper crafting! Thanks for reading and Happy Crafting, Everyone :)
I'm back with another GD post for Uniko's Stencil Sunday spot and this time I've decided to get at least one card ready for Christmas. I always always struggle with Christmas cards. I need so many, so when I saw the Let It Snow stencil in the gift pack Bev sent me, I knew it would give me a quick, easy and effective way to get at least one under my belt!
I took a card blank and masked off the edges. I then took the two shades of blue Distress Oxides that I have in my stash (I feel I need more of these!) and started blending the darker (Blueprint Sketch) on the top of the card, before adding Mermaid Lagoon to the bottom. I blended until I got a smooth blend where they met, sort of half way and sort of at an angle.
I then placed the stencil on top and with a lightly damp cloth, I dabbed it through to remove some of the colour. It spreads a bit under the stencil, but I never mind this as I think it gives the impression of melting - at least with this stencil.
I kept the stencil on and with some white pigment ink dabbed it through as well on top, to give the snowflakes a bit more definition.
A few sequins and a very simple sentiment popped up on foam tape and that is my first Christmas card done. Definitely one to try again - maybe in different colours?
Thank you so much to Bev for having me all through this month and thank you for joining me! Happy Crafting Everyone!
I feel a little like Buddy the Elf today. I want to shout 'Uniko's coming, Uniko! I know her, I know her!' because today is RELEASE DAY! And you can get all the lovely products that myself and Bev and all the amazing design team have been showing you all week.
Today is a fabulous blog hop and Treasure Hunt. A little more sedate than Anneka Rice (just aged myself there!!), but just as exciting.
The rules of the Treasure Hunt are:
1. Comment along the Blog Hop and find the icons
2. Email bev@uniko.co.uk with the following information:
- Design Team Member's Name & Balloon letter found
- What the Balloons spell out
Entries should be emailed no later than Thursday 28th February 2019, for the winner to be announced Friday 1st March 2019.
And the prize?? The ENTIRE 7th Birthday February Release - Amazing!! That's 6 clear stamp sets, 2 co-ordinating designer dies collections and 1 stencil design.
Now that's worth entering! And not only that, but Bev will also be drawing a random comment from the hop to win a £25 clear stamp prize package. Clearly Bev is well and truly in birthday mode!
For my card, I couldn't resist using that glorious Passiflora again. This time I stamped the outline image onto Copic friendly cardstock with Memento London Fog. I then added in details in different Memento inks and coloured the leaves with different shades of B and BV Copic markers.
I stamped the tendrils with some green, teal and grey Memento ink and cut all the images with the coordinating dies.
I could not resist using that abstract triangle stencil again - it's third outing this release, so you can tell how much I love it! - and did some very soft blending in the corner (again inspired by Lisa's post!) in greys.
I added the flowers to the top of the card and the sentiment to the bottom on top of the stencilling.
Next on the hop is Carol! Happy hopping, and good luck!
This is the last day of the release sneak peeks and I'm so glad I could be here as GD to share them all with you. I've had a great time!
Today I'm sharing this rather quirky stamp set called Background Blocks Pinstripe. As soon as I saw this set, I immediately thought of tartan - can't get away from the fact I'm Scottish! - and with my stamping tool I set to work to create a criss cross background by turning my card base and moving it up and down.
I used a lot of different colours of my little Memento Dew Drop inks. I have a small collection and used most of the brightest colours for as rainbow an effect as possible. As you'd expect, it ended up fairly dark in the centre with the colours showing at the edges, but I love the way it turned out.
I used the Yes, You set (this is added to release day orders of £25 or more up to Sunday 17th Feb 9pm GMT or while stocks last. After that you can buy for £5) to stamp out several of the words in bold colours which I attached randomly with foam tape. The little Yes, You in the corner then links to the inside of the card where I've stamped you are loved. A great way to remind people that we are there for them!
Thank you so much for joining me for all the sneak peeks. I will be back tomorrow for the blog hop at 9am - definitely worth joining in for a fabulous prize! Happy Crafting Everyone!
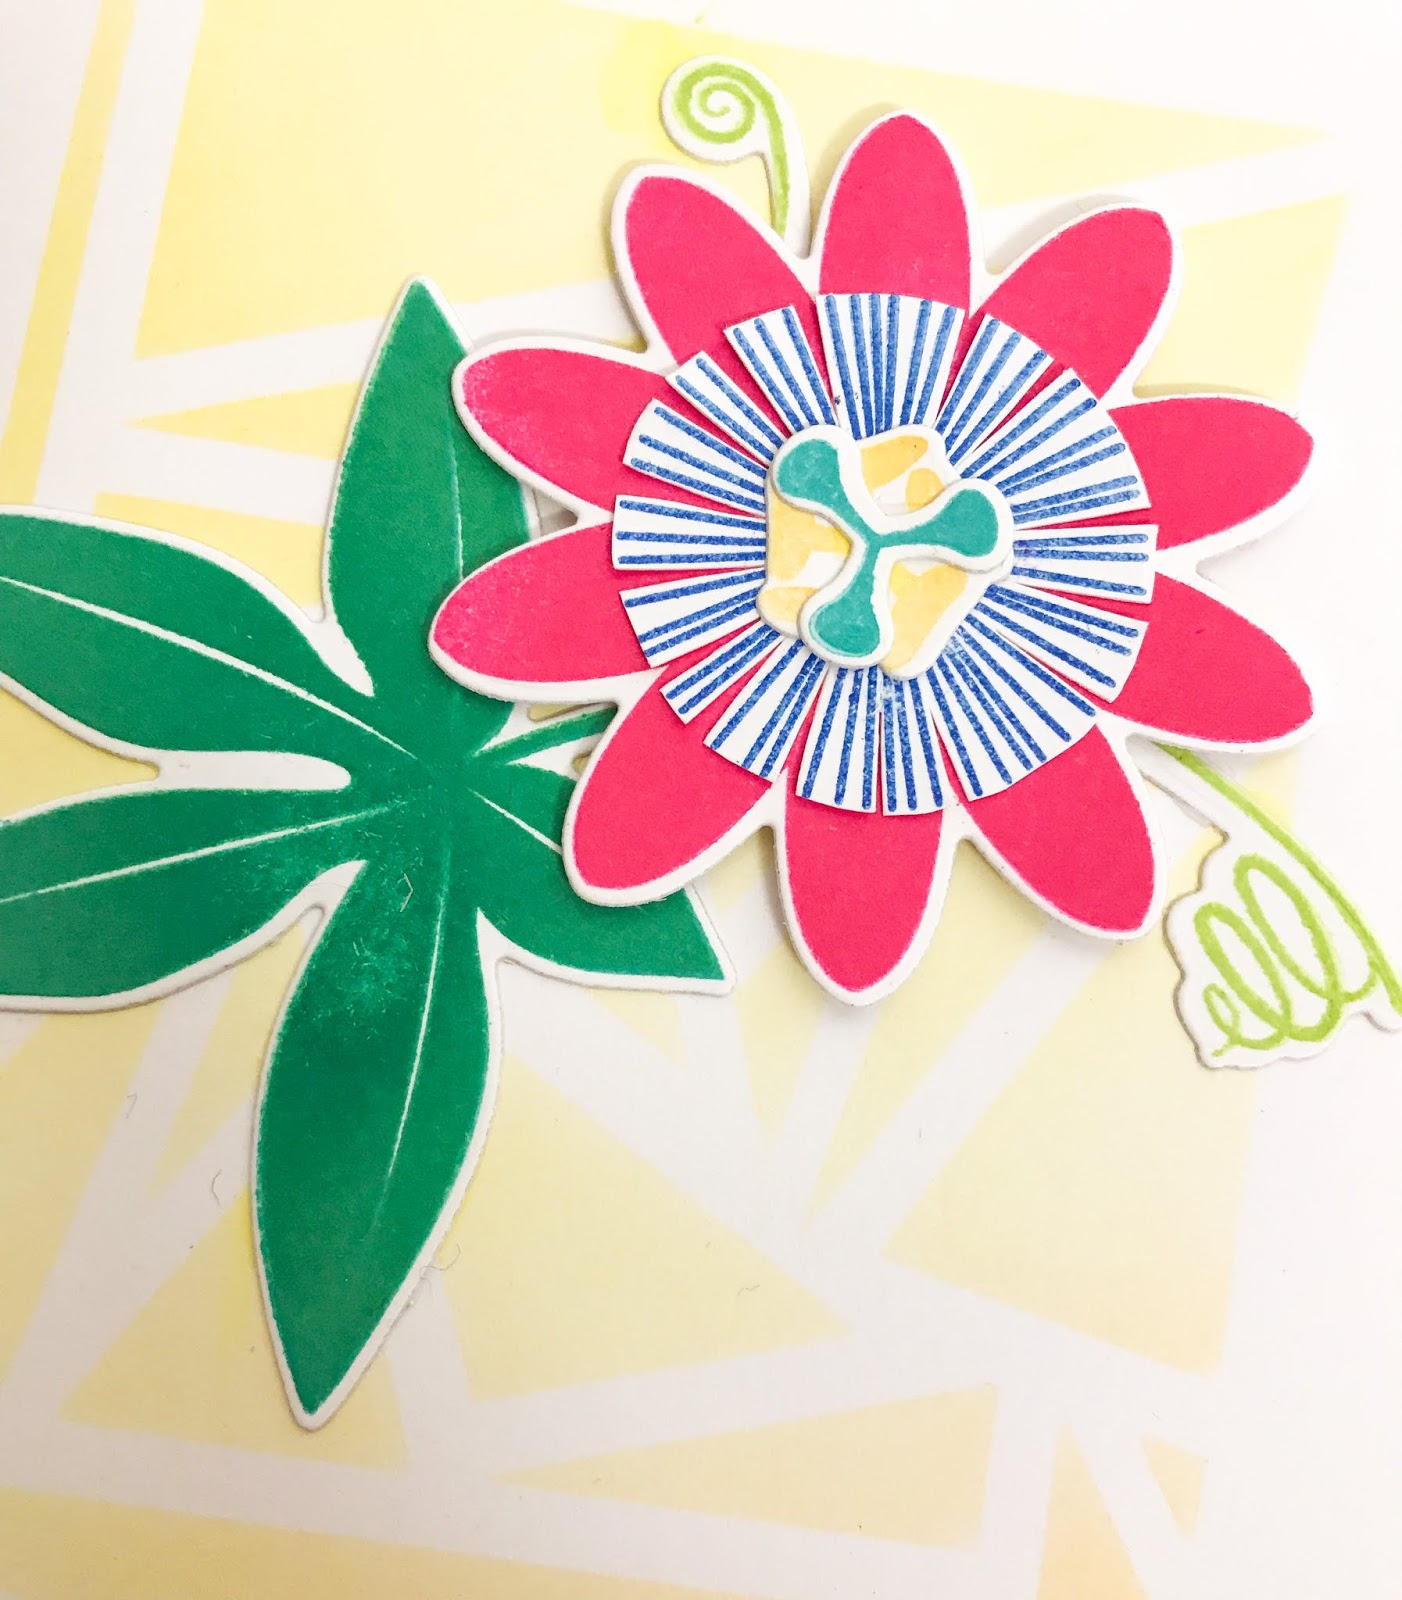
Welcome back to Day 4 of the Uniko February Release. Today we are introducing a floral set called Passiflora. We had one of these flowers in our garden in Scotland, that amazingly my mother grew from a seed. It's a climber with little tendrils and I can remember seeing it curling round the branches of the dead plum tree we had at the very back of the garden. It flowered every year and one year we had a fruit. It never really ripened though, but we enjoyed disecting it!
There are so many elements to this and you can build up layers by stamping. There's also an outline that you can colour in too. I've gone very much off the natural colours and built up my plant with bright colours from my Ranger Dye Ink sets that haven't seen much of the light of day for a long time. They are so bold though that they were perfect for this set.
I masked off a background area on the card base and used some yellow and orange distress inks with the Abstract Triangle stencil (see Tuesday's post) to create the background.
I then stamped all the separate elements of the flower and die cut them out. It was then just a case of building up the flower in the corner. I will admit I had to look at a picture just to check my memory was correct where all the different bits went!
A sentiment from the set in the bottom corner finished the card off nicely. I think this is my favourite from the release so far!
Tomorrow I'll be sharing the last new set and then tune in on release day on 11th for the blog hop and a fun way to win the entire release!
Happy Crafting Everyone!
Here we are on Day 3 already and I think you can probably tell just how much fun I've been having with the Uniko February release so far. Today it is the turn of a quirky small background stamp called Graffiti Texture:
This has a grungy and mixed media look to it, and it's something I would never have picked up, but I had a lot of fun with it. It's great for texture - like the name suggests!
I thought with Valentine's Day coming up, I might as well get a little romantic with this set. I took the graffiti texture block and stamped it onto various shades of cardstock with some Versa Mark ink. I then took some clear embossing powder and heat set it. I had an MFT heart die in my stash and cut out one from each piece of stamped cardstock.
I felt it would look too CAS on a card blank on its own, so I added some dry embossing with another MFT rectangle frame die I have that doesn't get much use, but was perfect for this - it's been used 4 other times now too!
Using my stamping tool, I then stamped the sentiment above and below where the heart would be and stamped in VersaFine Onyx Black.
I added a little detail on the inside with some of the smaller images from the So Much Clear Stamp Set (I get a lot of use from this little set, I love it!) and that was it.
Not long to go now until release day on Monday 11th and a fabulous giveaway. Hope you're enjoying all the intros from all the team!
Here I am again with another sneak peek and a card for Day 2 of the Uniko February Release. Today we are sharing a new stencil and a new very useful birthday sentiment stamp set.
I love Uniko stencils and I particularly like this one for its quirky design. It's called Abstract Triangles. I masked the stencil to give a border on a white card base and then did some simple ink blending through it in sunset colours (Picked Raspberry, Spiced Pumpkin and Mustard Seed).
I found some raspberry pink card stock in my stash and stamped and heat embossed the sentiment onto it with some Versa Mark ink and Wow! Bright White Fine embossing powder. I then trimmed this into a panel and used a We R Memory Keepers corner chomper on the edges. I wasn't sure about this as the abstract panel is very angular and the sentiment had very rounded edges, but the next day I really liked it!
I simply added the sentiment on top with some foam pads.
How are you all enjoying the release so far? I'm enjoying sharing all my makes. Please stop by all the DT members and Bev to see what they've created too.
I'll be back tomorrow with another card. Happy Crafting Everyone!
I am delighted to be back as GD for Uniko, most especially as it is their 7th Birthday. For any company to get to 7 years is a huge achievement, and most especially for a small company. My hat is off to Bev and all that she does. Having started a small business last year, it's hard, hard, hard, hard work, but so rewarding!
Today we are introducing Big & Bold Happy, a stamp set with coordinating dies:
I've used the dies that coordinate with the stamp set to add some big & bold writing to this birthday card.
I've die cut the happy word from some scrap cardstock in shiny dark blue and the bigger outline in vellum to add contrast.
The balloon bash stencil was ideal to add something into the corner of the card and I used some distress oxide in mermaid lagoon. The seeing stars stencil I added on top again in mermaid lagoon oxide ink and as it was a second layer, it looks darker - a tip I got from a blog post of Lisa's.
The die is so bold and eye catching, it didn't need anything else on it other than the word birthday. Such a useful and quick and easy set - another card for my stash!
Stick around for more sneak peeks this week and definitely release day on 11th. There's a fab blog hop and an amazing prize! Happy crafting everyone!
I am absolutely delighted to be guest designing for Uniko who have a new feature called Stencil Sunday. I love Uniko and I especially love their stencils - great price, great quality.
Bev very kindly sent me a few stencils to add to my collection and I'm using the Natures Treasures II set with these beautiful leaves. You also get the negative and the positive which means even more options, but here I'm just using the negative.
All I did was take a blank white card base, and very carefully holding my stencil in place, blended some distress ink through the stencil. It's easier if you use a sweeping motion almost as if it's a blending brush. I didn't even tape it down with masking tape as no matter what I do, I end up tearing the card. I did one in each corner of one colour, and the other in the other corner in another - Mowed Lawn and Evergreen Bough.
Then all I did after that was stamp the sentiment in Versafine Onyx Black and Distress Oxide Lucky Clover. Done!
With not getting much time for card making in between
running a business, stencils can make beautiful and simple cards so
easily. Indeed a friend recently said to me how much she loves my latest
cards because they are so simple!
Thank you for having me Bev and thank you all for reading. I will be back this month with more Uniko goodies - release week is coming up and I shall be joining in. So excited to share! It's really got my mojo going again. Happy Crafting Everyone!