Showing posts with label Memento Tuxedo Black. Show all posts

Friday, 17 July 2015

Birthday Balloons

Hello craft addicts! I really wish all the stamp and craft companies would stop bringing out new dies and stamps every month - said no crafter EVER! That includes me! As I said last week I got some stamps and dies from the new Clearly Besotted release on 5th July. I've scraped out some time to use the fabulous birthday balloons that were designed by Stephanie's (CBs Head Honcho) daughter. They are fabulous and perfect for little ones, so I inked them up to make a couple of cards for my bestest buddy's little ones' birthday - the plural is correct, for there are indeed two!

She also asked me if I would do more of a step by step and as baby slept really really well when I was making them, I had some more time to take photos as I went. Hope it makes sense!

Step 1 - I wanted the cards to be bright and cheerful and as I don't have enough Copic Markers to colour the balloon animals as I would like, I chose to ink them onto some Lawn Fawn Let's Polka papers using Memento Tuxedo Black. It's a technique that Lucy Abrams uses with great effect.


Step 2 - I then took the matching dies and placed them round the stamped images and secured them with some Washi tape. 


Step 3 -  I die cut them out two at a time - I find I don't get enough pressure sometimes with smaller dies if I do too many at once, especially as the die cutting machine cuts best on the top left hand corner!


Step 4 - Once the pieces were die cut out, I trimmed some white card to a size slightly smaller than the pre-cut cards I use. I like 9x13cm, as the cards are 10.5x14.75cm in size.


Step 5 - I like the corners rounded sometimes, so as I don't have a corner rounder, I use the one on the WRMK Envelope Punch board! Works just fine for me at the moment :)


Step 6 - I wanted some nice paper as a background, so I chose some coordinating papers from the Lawn Fawn Let's Polka Mon Amie collection. I trimmed it to fit the front of my card blank, as it's a 6x6" pad.
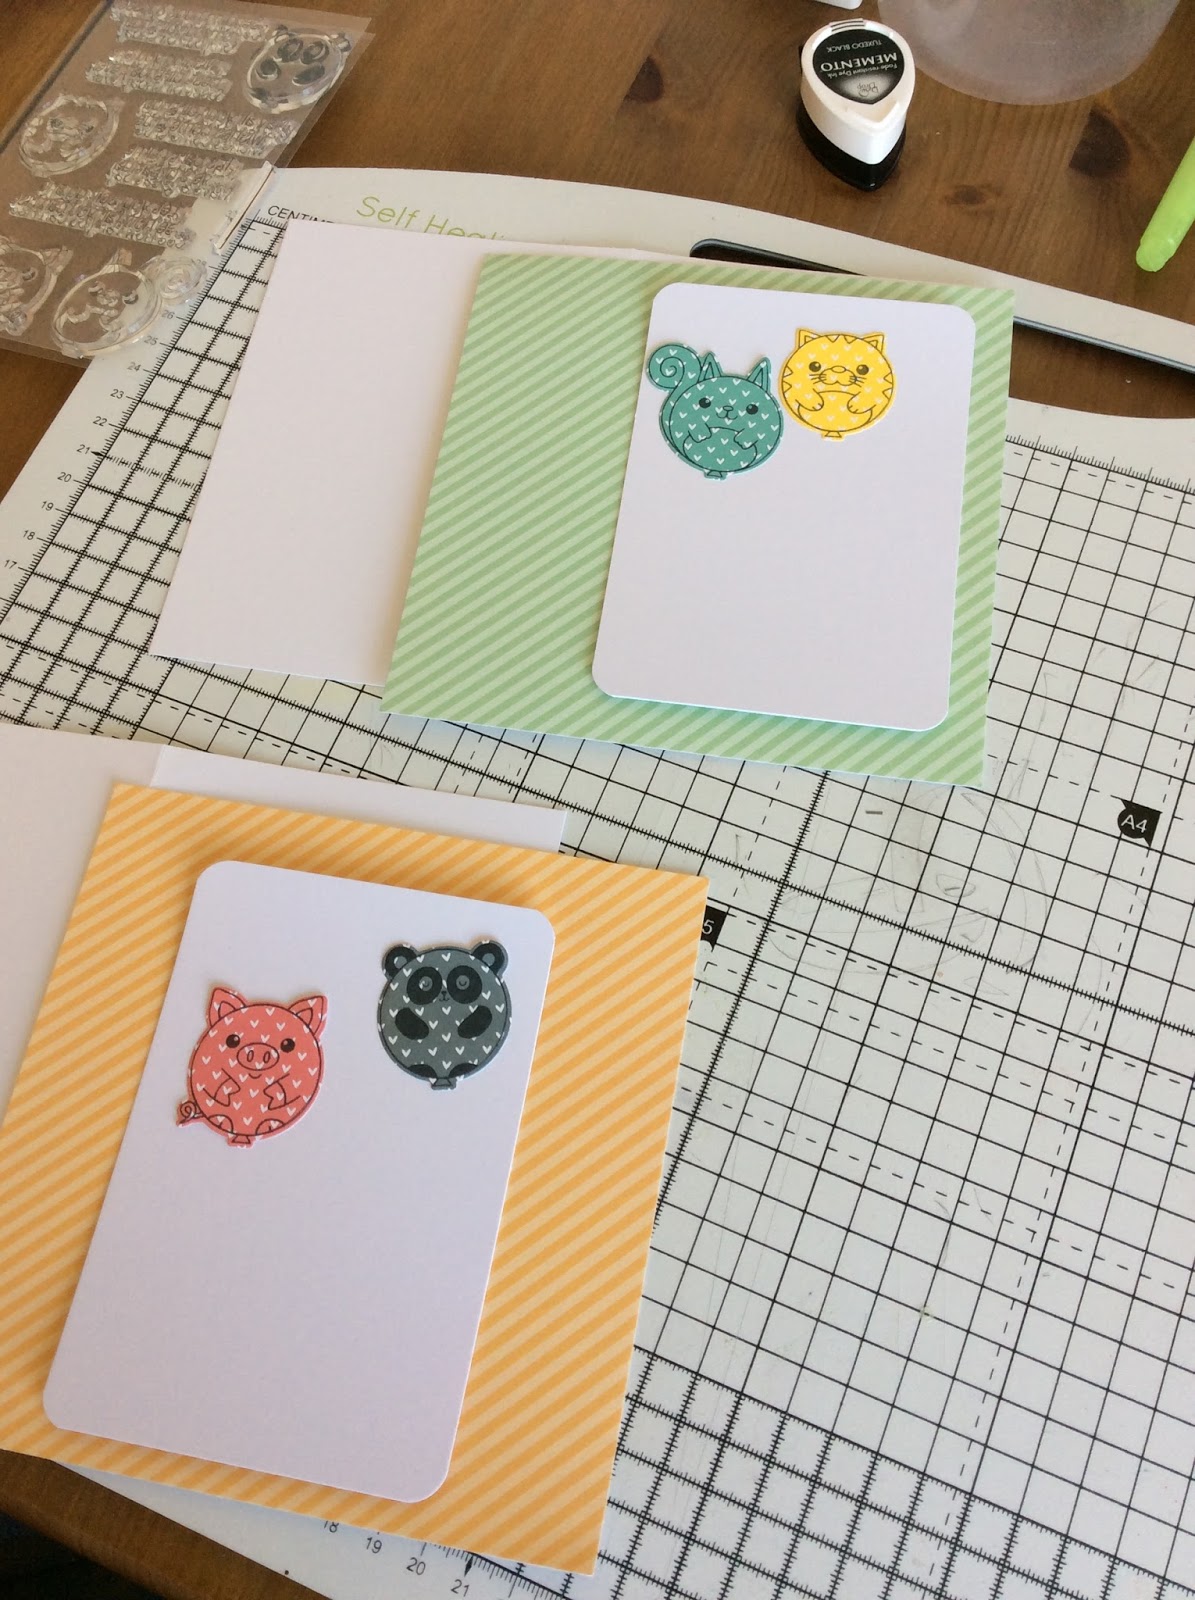

Step 7 - I then used some double sided tape to stick it down on the card front. I would love an ATG tape dispenser, but that will be in November's Simon Says Stamp purchase!


Step 8 - There are some balloon strings in the stamp set, so I positioned the balloons and stamped the strings underneath, then with some more double sided tape stuck the balloons on top.


Step 9 - I wanted to add their names, so stamped them on the front underneath in some little letters I got in Hobbycraft.


Step 10 - I didn't want the sentiment on the outside as it would be too cluttered, so I stamped them on the inside.


Step 11 - I wanted a little bit of dimension, but it needed to be firm as it's going in the post to Europe, so I used some fun foam on the back of the panel. It's such a genius idea thanks Jennifer McGuire! Love how you can see my knees in this photo! It's so professional ;)


Step 12 - Done!


A better picture of the cards. Decided not to colour the words, as I liked the clean look.


Supplies: CB Best Birthday Stamps and Best Birthday Dies; Lawn Fawn Let's Polka and Let's Polka Mon Amie 6x6 paper pad; Memento Tuxedo Black Dye Ink Pad; Hobbycraft Outline Alphabet  

Well done on getting to the bottom of this post. Hope you found it helpful/interesting, and as always, have a great weekend!

Friday, 10 July 2015

Graduation Thanks

Hello lovely readers! Sharing a very simple card with you today with the cutest set from last month's Clearly Besotted release. Sunday 5th was their latest release and I managed to get some more lovely stuff to play with - can't get enough of their things! The design team do such a good job of inspiring me.

On Wednesday it was nursery Sports Day and Graduation. Yes. Nursery graduation. It sounds like a silly idea, but really it's a way of saying farewell to those about to start school in September, and noting that they're about to start a new chapter. We went along to thank all the wonderful staff there who have helped our 4 year old turn into a confident and caring little girl. A card at least was required. (Don't worry, we also made thank you cakes!)

As you can see I've been practicing with my Copic markers. I met up with a crafty friend last Friday in the craft shop she works in not too far from here. She was so wonderfully helpful and I managed to get some more Copics as well as a myriad of other things.


Supplies: Clearly Besotted Let's Roll stamp and Let's Roll die set; Clearly Besotted Thanks Word die; Copic Ciao Markers; Stick It!; Foam Tape; Papermania 6x6 Capsule Collection; Ranger Multi Medium Matte; Memento Tuxedo Black

Apologies that the photo is not great. It's part of my birthday list to get a better camera, but that's not until November, I'm afraid.

It is so simple, just one of the CB Let's Roll hedgehogs stamped in Memento Tuxedo Black and coloured with Copic Ciaos (E57, E59 for the prickles; E53, E51 for the face; E18 for the feet and YR02 for the ears). I stamped the mortar board and scroll onto pink paper and die cut them - talk about tiny dies!!! I die cut out the CB Thanks die with some Stick It! on the back to make it easier to adhere to the panel of white card. Stuck the hedgehog in between using Multi Medium Matte glue then his mortar board on top and then the scroll at the bottom. The card blank has two strips of 1.5cm pink card stock at either side and this adds some colour - pink is her favourite colour, which is why I chose it. The main panel is adhered with foam tape and I added some Wink of Stella and Glossy Accents to the scroll. Simple and effective!

Thank you for reading as always. Have a fantastic weekend as always. Here's a picture of those Thank You cakes - pink as well of course. It was a brilliant day despite the weather - well it has to rain on Sports Day!


Friday, 22 May 2015

Hooray - You're Engaged!

Honestly, all these lovely people I know getting engaged, and I've got the trials of having to make a card ;). Of course, this latest lovely couple are just lucky enough to get one made with my new Hooray shaker die from Clearly Besotted - it is just yummy and fantabulous in one fell swoop....

I got some inspiration from the fabulous Clearly Besotted design team and gave another shaker card a go and am really happy with the results!


I took a basic card blank - C6 I think it is! - and trimmed another piece of white card stock to fit in the middle. I took some time to line up the Hooray die to make sure it was centred and level (not entirely convinced, but it's close enough!) and cut it from the card stock. I then cut it twice more, once from spare white card and once from some nice light turquoise, having put some Stick It! on the back before cutting. I then cut out the Hooray from each of these and put them to one side to make the shaker section.

I put some acetate on the back using strong red tape to cover the Hooray and adhesive fun foam to give depth and contain the sequins. I used some of Lucy Abrams Glacier selection - these are so beautiful! - and they obviously go well with the shaker dies she designed. With some strong red tape I contained the shaker part with another piece of white card stock, the same size as the shaker piece making it easier to attach to the card. I then attached the extra 'Hooray' words, one on top of each other, to give it depth and colour. I also then stamped the sentiment (should have done this first really!) from the Clearly Besotted Mr & Mrs set in Memento Tuxedo Black.

I then attached two thin pieces of Lawn Fawn Let's Polka paper to either side of the card before attaching the shaker section, to frame it.

Thanks as always for reading :)

Tuesday, 21 April 2015

Ranger Dye Ink

Hello there. I posted a picture of two new Ranger Dye Ink pads on Instagram and was asked for my thoughts about them, so I thought I'd do a little blog post.

One thing I have found difficult as a new stamper/card maker is deciding on which inks to buy. There are several different brands and types that look good from blog posts, but I haven't been able to decide, partly due to cost. 

I have been using two black dye inks (Memento Tuxedo Black and Ranger Archival Jet Black), and several VersaMagic Dew Drop chalk inks for a while. The latter I really like, but I wanted to try more colours with dye inks, and I went with Memento dew drops as they are a manageable price for me at the moment. I wasn't terribly keen on the results and felt it may be down to my lack of experience as a stamper.

I had seen Jennifer McGuire's video on inks for beginner stampers, and I liked the look of the Ranger Dye inks. On an unexpected trip to my local craft shop on Sunday afternoon I noticed they had them in and so I bought two as a trial.


I haven't used them on a card yet, but I did do a bit of comparison stamping with my Mementos and you can really tell the difference. The stamps are Clearly Besotted Mrs & Mrs and Bookworm sets. My apologies for the picture quality, I still need to get a decent camera sorted.


The images stamped with the Ranger Dye are clear and crisp, with minimal blotchiness and missing spots, compared to the Mementos. The colours too are sharp, bright and vibrant, which is what I like about them. They also feel much smoother on the card and they definitely make it very easy to get very good quality results as a beginner. The other interesting thing is they smell much nicer than the Mementos. I have no idea why, but for me that makes a difference too!

I shall keep the Mementos and see if I continue to use them as I like to have a variety of colours, but the Ranger Dye Inks have really impressed a novice and I shall be investing over the next few months in more colours from the range.

Thanks for reading! Please do leave me a comment if you have any other ink suggestions :)


Monday, 20 April 2015

With sympathy

I was really quite saddened to hear of the sudden death of Jonathan Crombie, who played Gilbert Blythe in the Anne of Green Gables mini series I loved. It was a big part of my early teens and me and my sisters watched it whenever we could. That and a difficult day on Friday, has left me in a little bit of a somber mood, so I made a very simple sympathy card.

I'd also like to enter it into challenge #119 over at CAS(E) This Sketch. The cards up there are so good, but hey ho, I like to give things a go!


I started with a white card blank and simply stamped the rose in Memento Lady Bug, the little leaves under the rose in Versa Magic Hint of Pesto and the stem in Memento Cottage Ivy. The stamp is the free set from Simply Cards and Papercraft issue 133. Honestly, I've used this so often, I wonder why I buy stamps at all? I then coloured them in with my Derwent Artists pencils. I never realised how much I enjoy colouring. It is so therapeutic.

The sentiment is from Clearly Besotted Sweet little sentiments set stamped in Memento Tuxedo Black onto some red paper and cut out with my Clearly Besotted Long Flag die.

Thanks for reading. I hope your day has been good. The sunshine came along here this afternoon so we had a play in the garden.

Wednesday, 8 April 2015

I like big books...

I bought a few nice things in the March release from Clearly Besotted Stamps. I do so love their style! The Bookworm Additions I had to have because I'm a librarian by profession and have lots of librarian and also book loving friends who will appreciate this... if only for the pun on the flag!

I have some Kraft card I bought a few weeks ago as I kept seeing it mentioned in various magazines and blogs. I'm not entirely sure I like it, but I'm willing to give it a go. I also hadn't used any lovely Bazzill for a while, so I grabbed some of my browns as I thought it would go with the Kraft. Who knew I'd like brown so much?


I started by stamping one of the books from the Bookworms set using my old favourite, Memento Tuxedo Black and colouring it in with my Derwent pencils with a bit of metallic from my new Caran D'Ache set. I stamped the two bookworms (one from the main set, the other from additions), plus the flag with my Versa Magic Dew Drops - Hint of Pesto, Aloe Vera, Perfect Plumeria - and then die cut them out.

I took some Bazzill card stock and cut to size to layer on the Kraft. I then die cut a circle using my Nestabilities Circles, from the top piece. It is just wide enough to show the bookcase behind it. I glued the bookcase to the back card, then stuck the bookworms to the back of the top piece of card, so they'd be in front of the books (they are a bit cheeky those bookworms!). I then attached the top piece with foam tape to add a bit of dimension. The banner I also adhered with foam pads.

It makes me laugh and I hope it does you too! Thanks for reading :)

Monday, 6 April 2015

Monkey baby

A friend had baby no. 2 last week. Another little boy. Time for a card! I've been thinking about it for the past week and decided I'd incorporate it into the Tic Tac Toe challenge from Make The Day Special. I've chosen the diagonal Metal/Metallics-Circles-Stripes. It actually turned out pretty much how I envisaged it which is a first!


I started by stamping the balloons from the Up and Away Mama Elephant set onto a piece of white card using Memento Tuxedo Black. I coloured the balloons in with my new metallic pencils from Caran D'Ache. I love them and have to use them again soon! I cut them out (I need to get the dies to go with this set) and attached them with foam pads to the stamp on the card blank. I stamped the monkey onto the card blank holding the balloon strings and coloured him in with my Derwent Artists Pencils.

Now, the tricky bit was the tail and the little blue bundle. I used a cut out balloon to create a stencil of the bundle and cut it out of white paper then inked it up with in Aspen Mist. I got some blue and white twine and tied it round the neck of the bundle. I then stamped the monkey's tail onto some white card, coloured it in and then cut it out - that was hard! I then threaded the twine through the tail and stuck it onto the monkey and a foam pad under the bundle. Think it works well!

The jungle is the free Clearly Besotted fuschia stamp from Simply Cards and Papercraft issue 133 and stamped multiple times in Hint of Pesto. The sentiment is also from Clearly Besotted (yes I am!) and their Sweet Little Sentiments set.

I added the stripes from my Pebbles basics set down the side because I needed stripes for the challenge.

Thanks so much for reading. Please feel free to leave me a comment. I love hearing from you. I hope you've had a great Easter weekend. 

Sunday, 29 March 2015

Sweet...

It's not usual I get crafting done during the day except when baby naps AND 4 year old is at nursery, but I managed it today!

We've had a few happy family events lately, one of which is a new baby for a cousin across the Atlantic. I used the opportunity to make a card and had a play with those free Clearly Besotted stamps I got from Simply Cards and Papercraft 133 and did some masking for the first time.

It's not what I'd call a typical baby card, so on the inside I stamped new baby from the Sweet Little Sentiments set.

I used a card blank and covered it with some pink spotty (yes it was a girl!) backing card from my Pebbles basics. I stamped the jar in Memento Tuxedo Black and then did a few masks of the sweet and stamped away with a selection of VersaMagic DewDrops in pastel shades. I made a mask for the 'Hope your day is as Sweet as you are' sentiment and blocked out everything but the 'Sweet'. The card topper is mounted using foam tape.

Husband was rather impressed and I have to say I thought it wasn't bad for a first attempt at some masking.

Thanks for reading. Hope your weekend has been crafty too!

Friday, 27 March 2015

Ruby Anniversary

Back from Switzerland in one piece and with a commission! My friend really likes my cards, so she asked me if I could do one for her Mum and Dad's ruby wedding anniversary. After many false starts - I just couldn't get the stamping right - this is what I came up with:


I bought some nice card today in Hobbycraft. It's Papermania Capsule 6x6 smooth cardstock and I love all the different colours. I used a supposedly 6x6 card blank (it is in actual fact 14.75x14.75cm), so I'm a bit annoyed I had to trim one of the red cards to cover the card front. The decoration was done on a 14x14cm piece of white card. The butterflies are from Tattered Lace Vine Die I got as a Christmas present die cut from another piece of red card. The decoration is from the Clearly Besotted Mr & Mrs set using Versa Magic Dew Drop Red Magic with the statement in Memento Tuxedo Black. I added a strip of red velvet ribbon I had in my stash from Christmas card making.

It's been so nice to have been asked. Who knows, there may be more!

Thanks for reading :)

Tuesday, 10 March 2015

Hang in there

Hello again. Here is card number three from my crafting mania of Thursday morning. I really enjoyed making this one. It's just stamping with a bit of colouring. I'm definitely realising that I prefer Clean And Simple (CAS) cards.


Monkey here is from a Mama Elephant stamp set called Up and Away that I purchased from Make the Day Special. Golly, they have some lovely things. I was good and only bought this set, but I was sorely tempted to buy so much more!

I started by using my three Derwent Inktense Pencils (Hot Red, Sun Yellow and Lagoon) to create a nice rainbow of colours. Once dry, I stamped the balloon onto it using Jet Black Ranger Archival Ink and cut out the balloons and not the string with my Tonic fine control scissors. I then stamped the balloons onto the card with the archival ink and the monkey (and its tail which is separate!), holding onto the strings, in Memento Tuxedo Black. I stamped one of the sentiments from the set and then using foam pads added the coloured balloons. It looked a bit plain despite the balloons, so I coloured in the monkey using some of my new Derwent Artists pencils (they were cheaper in the shop!). I know a lot of you use pens (Spectrum, Copic, Promarkers), but I have a fondness for pencils at the moment.

I really like it and I think I'll use this set again and again. 

Thank you for reading!

Friday, 6 March 2015

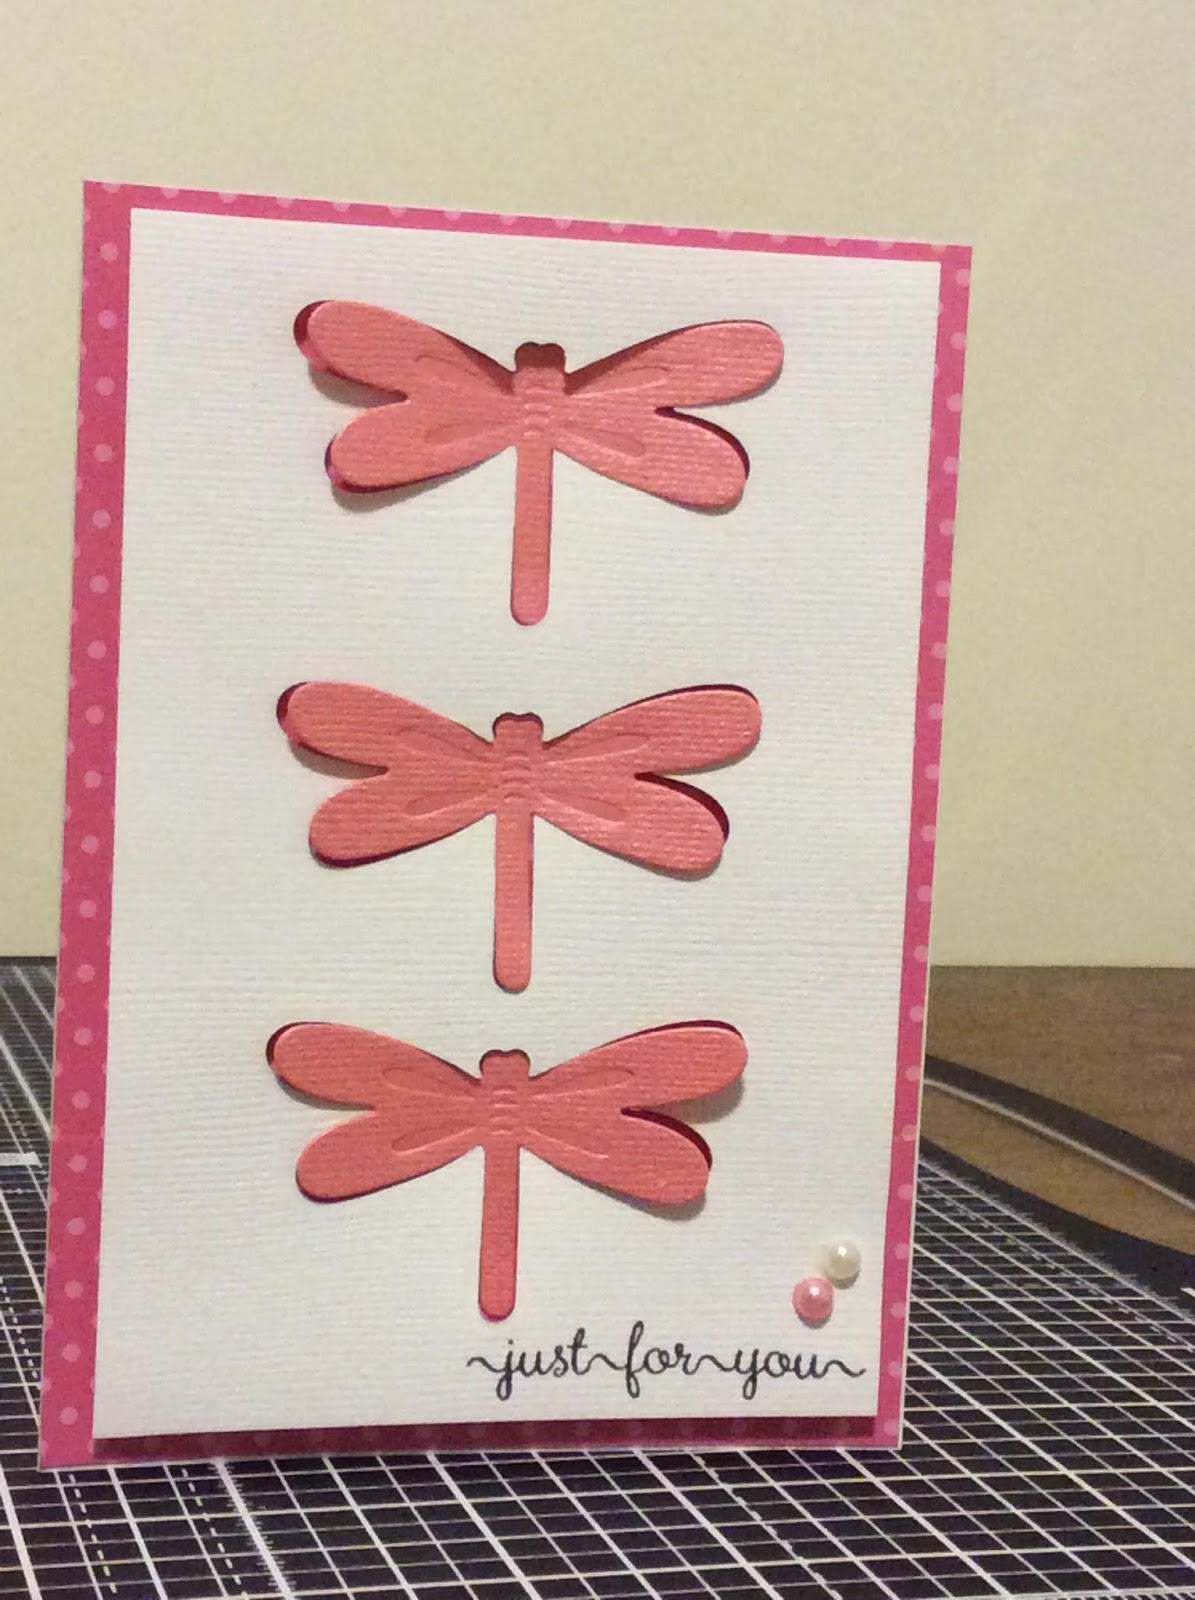
Dragonflies

Hello! Yesterday morning while the baby napped I crafted like a demon. It's lucky I did because we had no power all evening from 4-9pm - not great with tiny ones. Thank heaven for my old whistling kettle and a gas hob!

So, here are two of the three (yes! 3!) cards I made. It's using the free dragonfly die and stamp set that came with issue 134 of Simply Cards and Papercraft. I like to try out some of the cards when I get an issue using similar products that I have in my stash. I get to try new techniques without buying even more stuff, especially as I was waiting for the new Clearly Besotted Stamps March release. I've also decided, that if I have time and inclination, I'll make multiples of cards. Means I can dip into my cards when I need one in an emergency.


They're both made in the same way using an A6 pre-scored card blank. I covered them with spotty paper from a pack of Pebbles Card Making Basics. This isn't ideal, as it has a score line so you can make them into cards, but it is not too noticeable when as a card back. 

I then die cut three dragonflies from a sheet of Bazzill paper - white and pink (Bazzill Bling). I added the sentiment from the Clearly Besotted sweet little sentiments stamp using Memento Tuxedo Black ink and added a couple of sticky pearls. 

I adhered the card top to the card using foam pads on the top card, but on the bottom one, I just used glue, to see which I'd prefer (glue!). I then put some glue on the body of the butterflies and stuck them into the apertures, bending the wings slightly so they were proud of the card.

Thank you for reading and I hope you like :)

Blog design by aleelilydesigns