Showing posts with label Newton's Nook. Show all posts

Sunday, 17 April 2016

Let's Sail Away - Shakers with the Fuse tool and Newton's Nook - VIDEO

Hello Fellow Crafters! How are you all? It was our last day of the Easter Holidays today and the weather, in typical fashion, was fabulous. Chilly, but gloriously sunny and we got the grass cut and spent lots of time in the garden.

I mentioned in my crafty haul video that I had been making cards with my Fuse and the Newton's Nook stamp and die set Message in a Bottle that I bought. I was inspired by seeing Kim Dellow's tutorial on using the Fuse in my recent edition of Simply Cards and Papercraft #148. I felt it was time I had another play with it and this is the result. It is such a brilliant idea to use the die as a Fuse guide.


I started by approximating where I wanted the bottle to be on some Neenah card stock and then stamped the ship, placing the die around it and then the bottle around that - made it easier to cut them both at once!

I then taped the bottle die to a bit of an A4 thin plastic wallet (I got these in a supermarket for £1 for 10 and I find they work well), where I wanted the aperture so I could get the ship and sequins in.


I then Fused around the die. I do love this tool. I find I need to get it hot, and I mean leave it 15-20 minutes to heat up hot. I always test it on a corner of plastic first. If I find I can pull it apart easily, it hasn't Fused properly and I need to leave it longer to heat.


I leave mine on a spare bathroom tile on the floor next to me. I need to sort out a proper holder, but since it's only me in here when crafting it's not a problem. I always unplug if I have to go away for anything more than 30 seconds - better safe than sorry!

I digress! I then cut around the shaker and added my sequins, and then the ship, Fusing up the gap. I then taped it to the back of my card panel, and then with double sided tape to the card base. I then added the sentiment to the front - next time do this first!! - and some coloured dew drops that I had in my stash from a giveaway win from Michelle.


And here is the video showing how I made it. Thank you for your continued support of my videos, it means a lot as I'm so new to it all!

  
Below is a list of what I used to make this card and where I purchased them. Please note I DO NOT USE affiliate links.


I loved making this card and I hope you found it interesting and useful. I love experimenting with my gadgets. Thank you so much for reading, and for watching, and for all your lovely comments. They really do make my day :)

Friday, 16 October 2015

Home via Snail

Hello - Again! Friday seems to come round with increasing alacrity these days - or maybe I'm just getting old....

So I've been playing around with my beloved Inktense pencils again. As part of the 30 Day Colouring Challenge, I finally did a swatch of all 72 one evening (see Instagram!) and while doing so, I realised there were some colours I'd never used, so I decided to use them...

These cards started out as late birthday cards and morphed into New Home shaker cards - it was one of those evenings!!!


I started out by colouring in the snail from Newton's Nook In Slow Motion using a range of different Inktense pencils. This always takes a while and I love that I can colour in bits of it, go away, come back and do some more. It's a slow build up of layers, leaving each of them to try in between.

Once I'd fussy cut them out, that's when I totally went off tack and started die cutting bits of Bazzill card I had that matched the snail - lucky! I then remembered my Sugar Pea Designs 'Home' die and decided that would be great for some paper piecing, and so that's what I did on the background. If I'd thought about it first, I'd have used some Stick It!, but I found that a couple of bits of double sided tape on the back worked really well for popping in the die cut piece and even those tiny hearts and windows in the opposite colour.


So, once the background piece was stuck onto my card blank, I added a piece of acetate to the back of the frame and a whole pile of foam pads round the outside. It's fiddly because they are so small, but I like the height of them and that they can be placed into any shape - easier for round apertures I find. I then took a couple of my favourite shaker sequin selections (who am I kidding, I love them all!!), French Lavender and Phosphorescence and placed them on top of the word Home, then the frame around it - this works much better for me than placing the sequins into the frame and plonking the card on top - it always ends up squint. I then just added the snail to the corner with some Tombow liguid glue.


Isn't he cute?? Seriously, I never thought a snail could be so cute!


[Supplies: Newton's Nook In Slow Motion; SugarPea Designs Home; Derwent Inktense Pencils 72 set; Derwent Small tip waterbrush; Ranger Archival Ink Jet Black; Bazzill Basics 12x12 Papers; Simon Says Stamp Stitched Rectangles; Little Things from Lucy's Cards - French Lavender and Phosphorescence; Tombow Mono Multi Liquid Glue; Foam pads; Hobbycraft A4 Premium White Cardstock 300gsm; EK Success Powder Tool]

I do love a shaker and the colours are so wacky!

Thanks for joining me again. Will be back with more Copic colouring next week. In the mean time, thanks for all your lovely comments and have a great weekend :)

Friday, 7 August 2015

Shell-abrate

Happy Friday, Crafty Friends! So we're up in Scotland on holiday and I find it's hard to have a day go by without crafting something now, but it has been nice having a break from the usual routine and seeing family and friends. 

Onto my card! I made this a couple of weeks ago using my current favourite stamp set, Newton's Nook In Slow Motion. When this set was released, I saw a fabulous card by Taheerah Atchia on their blog which had used loads of masking using the little envelope stamps. I thought I'd have a try and make a birthday card for a friend.


Supplies: Newton's Nook In Slow Motion Stamp Set; Ranger Dye Inks; Various Copic Ciaos; Lawn Fawn Let's Polka 6x6 paper pad; Fun Foam; Post It Notes (for masking); Memento Tuxedo Black Ink; Double Sided Super Sticky Red tape

I really like how it turned out, especially the masking of the worm and the envelopes. I started by taking some Copic friendly paper and cut it to size (9x14.75cm) to fit across my card blank. I drew a light pencil line at 2.5cm so I had something solid to stamp on and the critters didn't go all wonky. I stamped the tortoise and then got to masking out my pile of letters. I used both little letters and stamped them 5 times on sticky post it note and cut them out and started stamping and masking, stamping and masking until I got the colourful little pile I wanted. Here's a little picture during the process. The paper at either side of the image is to protect it from smudges - a little late, as it got a couple of thumb prints on it before I put it down :(


I then masked the edge of the pile and also stamped a little party hat next to it and masked it off. I then stamped the worm as if he was peeping out of the pile of letters. Cute!

I then got to colouring with my Copics. I do really like these, and am trying to get in as much practice as possible, but I need to get a few more in green and blue. Once they were coloured in I stamped the sentiment in the corner and also trimmed the panel to get rid of the thumb prints. I then stuck some LF paper on the card base and attached the panel with fun foam and red tape. 


I'm amused by the results and hope you are too! As always, thanks for visiting, I really do appreciate it, and any comments you leave. Have a great weekend, as always!


Friday, 31 July 2015

In Slow Motion...

Hello there Craft Lovers! Another week, another blog post and I can't believe I've managed to keep this going for 6 months now. It seems very odd to think my first card was made in October and my first blog post at the start of February. In that time I've met some great people in blogland and on Instagram (it's a happy crafting place!), and have made quite a lot of crafty purchases, which in turn have made card recipients also very happy indeed. 

Enough of me, on to the cards. I did make quite a few crafty purchases this month, one of which was this adorable set In Slow Motion from Newton's Nook. I haven't bought anything from them before, but I have my eye on some more of their things. I'm loving this set and have used it to decorate an envelope, and also made several cards - including this post from a couple of weeks ago - Sloth-some

I was on a bit of a roll mid week when making these, and ended up doing three in one day - unheard of especially with both children around, but somehow I managed it!

The first I made in record time while baby was playing in her cot and 4 year old was watching TV - 20 minutes is a record for me!


Supplies: Free Balloon die from Simply Cards and Papercraft issue 139; Papermania Capsule Collection; Newton's Nook In Slow Motion Stamp Set; Clearly Besotted Best Birthday Stamp Set; Faber Castell Pitt Artist's Pen; Copic Ciaos; Ranger Multi Matte Medium

I had pre-cut the balloons, and just stamped the image onto the card base, as well as onto Copic friendly paper. I placed the balloons where I wanted them and using a Faber Castell Pitt Artist Pen added in the strings to the worm. I coloured in the worm, cut him out and stuck him onto the image using Multi Matte Medium, adding the string round his middle. The sentiment was stamped on the bottom and I hand drew the border, having seen it done to great effect by Julia Alterman in a recent video (Daydreaming with Inktense Pencils). That's it! So quick!

Later in the evening when the children were asleep, I made another two, this time using my new Derwent Inktense pencils. I fell in love with these when I first started blogging, but for some reason I never purchased a set. I now have the tin of all 72 and I still love them. Previous posts include Birthday Express and Birds on a Wire

Both cards were made in a similar way, stamping the images onto the card blank, then onto some Tim Holtz Water Colour Paper, and colouring with various Inktense pencils. I love colouring with these. I then fussy cut both out, and adhered them with foam tape, and drew my border in by hand again, then stamped the sentiment as shown.


His coat has been coloured in with the white Inktense pencil, but it didn't really show up, instead it gave it some interesting texture!


Supplies: Newton's Nook In Slow Motion Stamp Set; Derwent Inktense Pencils; Ranger Jet Black Archival Ink; Tim Holtz Distress Water Color Cardstock; Faber Castell Pitt Artist Pen;

I absolutely love these pencils and am so glad I finally got them. 

Thank you so much for reading as always, and have a brilliant weekend. We're finally off for a break next week, but I hope to still have time to share some a card with you while we're away.


Tuesday, 14 July 2015

Sloth-some

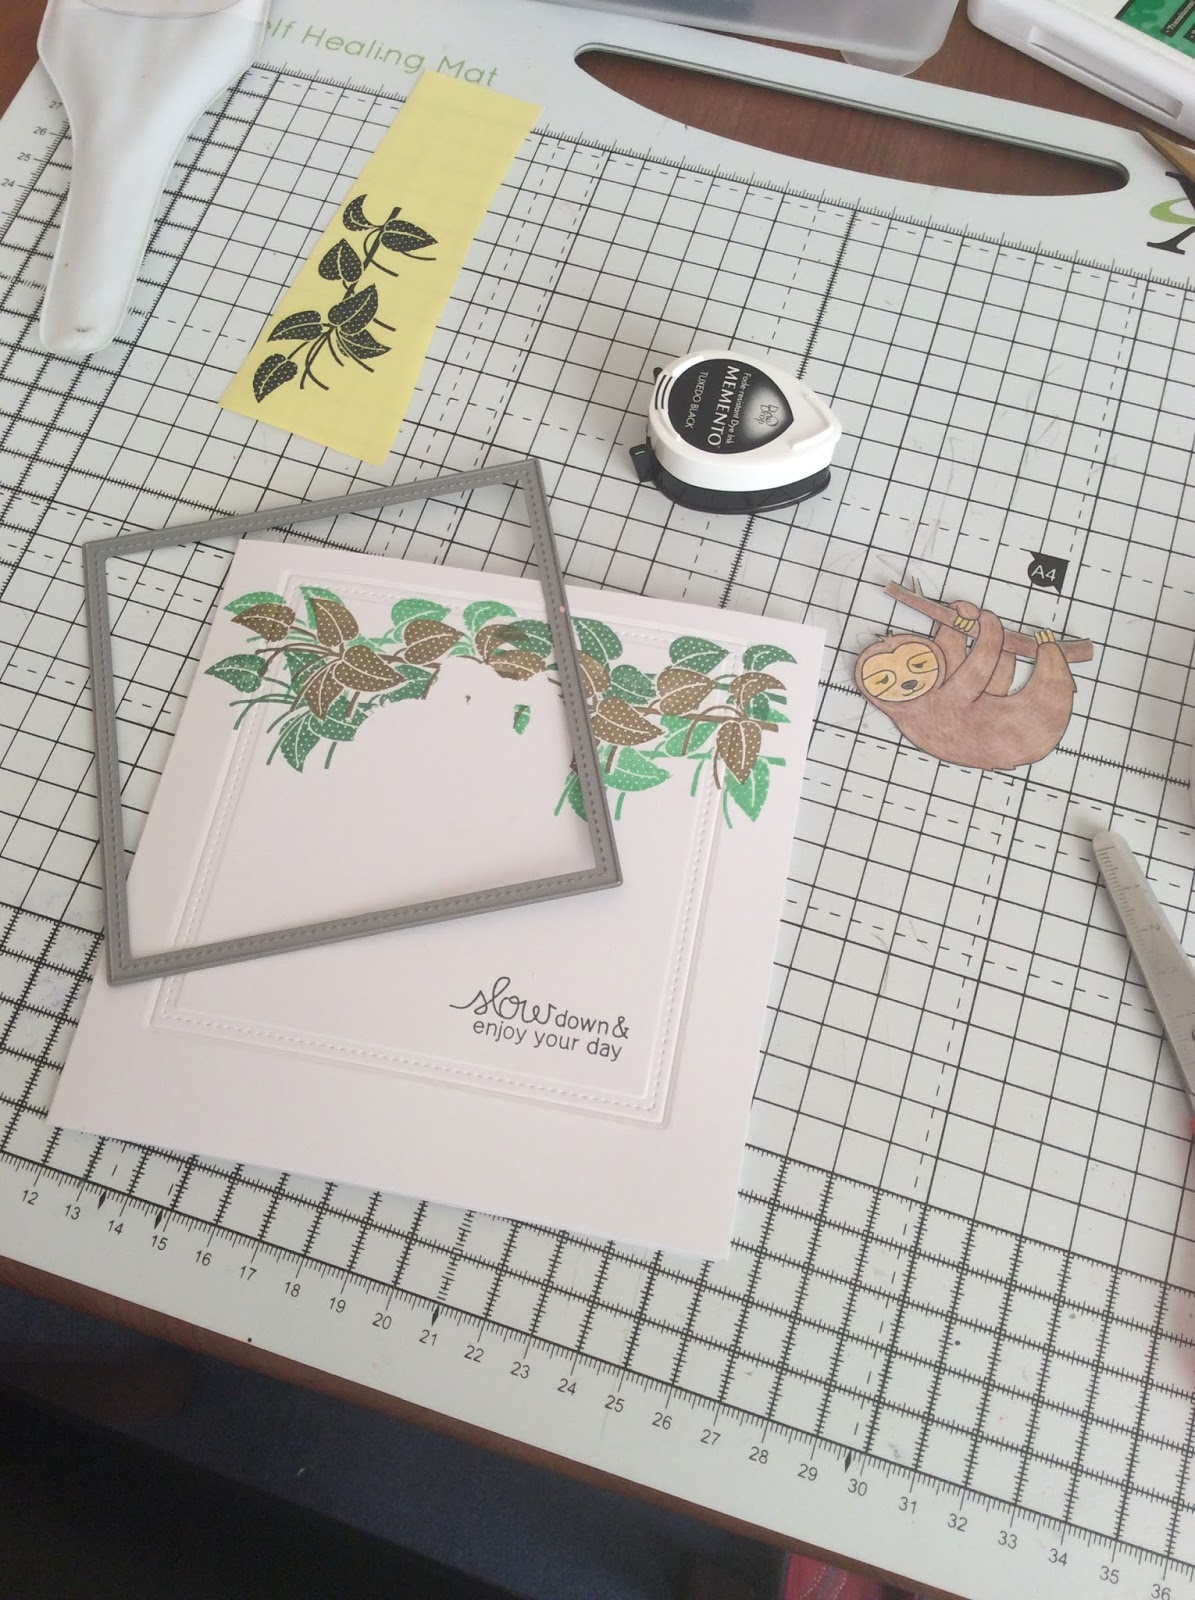
Hello! A post mid-week from me to get in to the Simon Says Stamp Wednesday Challenge - I think I have about 15 hours left! I saw it was Furry Friends and Newton's Nook and as part of my happy mail last week from Make the Day Special was my first set from them - In Slow Motion - I couldn't resist.

I love this set - I've already used it once to decorate an envelope! - so I thought I'd use the sloth - how can a sloth not be a furry friend?

[Supplies: Newton's Nook In Slow Motion; Lawn Fawn Large Stitched Square Lawn Cuts; Memento Tuxedo Black; Versa Magic Hint of Pesto; Ranger Dye Lily Pad; Memento Cottage Ivy; Derwent Artist's Pencils; Caran D'Ache Prismallo Aquarelles; Copic Ciaos]

I had to look up a picture of a sloth on the internet to work out its fur. I stamped the sloth a couple of times to try out what media to colour with. The final result was a strange mixture of Copics, water colour pencil and coloured pencils. The body was coloured in Copics (E57 with C2 on top), with white water colour pencil on the top; the face, claws and branch were then coloured using coloured pencils. 


Here's a little close up of the fur - I think it works quite well!


I then fussy cut him out. I also made a mask of the sloth and then the leaves on a post-it note and cut them out. 

I positioned the sloth post-it on the card and got to stamping the leaves with some of my greens - Versa Magic Hint of Pesto; Memento Cottage Ivy; Ranger Dye Lily Pad - and masking off the ones I wanted to stand out.


After removing the masks, I positioned where I wanted to emboss my stitched square around the sloth, and then stamped the sentiment on the inside. I then ran it through my Grand Calibur - I need to emboss my dies a lot more. I really like the results.


Normally I'd pop the cut out piece up on foam, but I decided I'd like a more one layer card - it's much cheaper on postage! - so just used some double sided tape.


I'm quite impressed I managed this today, but my 4 year old helped me by sharpening my pencils and doing a bit of colouring beside me while her sister had a long nap. 

Thanks so much for reading! Hope your week is going really well.

Blog design by aleelilydesigns