Showing posts with label Uniko. Show all posts

Friday, 19 June 2026

Geometric Butterflies In All Manner of Colours

I am a huge fan of Bev's Ink and Flip stencils and when we had our recent mash-up back in May, I purchased the Ink and Flip Geometric Butterfly Layering Stencil and finally managed to get some time this week to play with it.


I'm also a huge fan of all the In Color Inks from Stampin' Up!, including the fabulous new magnetic ink pads in the 2026-28 colours - Barely Blush, Peaceful Pine, Golden Glow, Hydrangea Hue and Crisp Cantaloupe.


What happens when you mash them all together? A joyful and bright fusion of colour and style, that's what! 

Here's what you need and how to make them:

Supplies:

  • Ink and Flip Geometric Butterfly Layering Stencil
  • Ink and Flip Layering Retro Flowers Stencil  
  • In Color Inks 2024-6 Peach Pie, Shy Shamrock, Pretty in Pink, Summer Splash and Peach Pie Cardstock
  • In Color Inks 2025-7 Cloud Cover, Secret Sea, Strawberry Slush, Darling Duckling and Darling Duckling and Cloud Cover Cardstock
  • In Color Inks 2026-8Crisp Canteloupe, Hydrangea Hue, Barely Blush, Golden Glow and Hydrangea Hue Cardstock
  • Per card two pieces of white cardstock 4.5 x 4.5 inches 
  • White card for inking butterfly apron 3.5 x 3.5 inches
  • Circle Die 3.25 inches in diameter
  • Blending Brushes
  • Glue
  • Foam pads
Method:
  1. Ink up your butterfly in two of the colours from whichever In Color set you're using and fussy cut.
  2. Cut a piece of card 5 x 10 inches in one of the butterfly's colours. Score and fold at 5 inches to make your card base.
  3. With the two colours you didn't ink your butterfly in, ink up your layering retro flowers stencil onto one of the white pieces of card
  4. Die cut the circle from the other white piece of card
  5. Using foam pads attach the card with the circle aperture on top of the flower stencilled card
  6. Attach this to the front of the card base
  7. With foam pads and glue, attach the butterfly on top in the bottom left hand corner.

There's a reason I love these colours - they just all go together so well. The possibilities are endless too with 5 ink pads in each collection. What is your favourite? I don't recommend things I don't absolutely love and all of the inks I absolutely love!


To get your hands on the In Color 2025-7 and In Color 2026-8, head on over to my Stampin' Up! shop

Thanks so much for reading, and I hope you get some crafty time this week.


Monday, 1 June 2026

Fruity Stencils and Funky Colours

I discovered when prepping for the recent Uniko and Stampin' Up! Mash-Up All Day Retreat (there's another one coming on 26th September so save the date!) that I owned quite a few purple inks - not a colour I'd immediately think of to buy, but ones that I have somehow managed to accrue.

I then decided to have a look through what other ranges of inks I had, and use them to ink up this fabulously fruity Uniko stencil, which I'm trying to persuade Bev to get back into stock as I took the last one!

Here they all are, along with the ink colours used. You can find all the products I used in my Stampin' Up! shop:

1. HELLO 


Card base - 14.8 x 21 cm, folded at 10.5cm
Granny Apple Green Panel - 13.8 x 9.5cm
Stencilled Panel - 13.3 x 9 cm
Colours of ink used - Lemon-Lime Twist, Daffodil Delight, Darling Duckling, Golden Glow
I die cut a sentiment from the panel and then 3 others in plain white and layered them all up and popped it back into the card. Love the look.

2. HAPPY BIRTHDAY ORANGE


Card Base - Timid Tiger 14.3 x 21cm folded at 10.5cm
White card - 10 x 13.8cm
Stencilled Panel cut into two cm strips - 10 x 13.8cm
Sentiment: Timid Tiger - 6 x 2.5 cm; White card - 5.5 x 2cm
Inks used - Crisp Cantaloupe, Peach Pie, Pumpkin Pie, Timid Tiger
To make the double vision technique, cut the stencilled panel into 2cm strips and alternate glueing one strip, then using foam pads for the next.

3. HAPPY BIRTHDAY LIME


Card Base - Granny Apple Green 14.3 x 21cm folded at 10.5cm
White card - 10 x 13.8cm
Stencilled Panel cut into two cm strips - 10 x 13.8cm
Sentiment: Granny Apple Green - 6 x 2.5 cm; White card - 5.5 x 2cm
Inks used - Lemon-Lime Twist, Granny Apple Green, Peaceful Pine, Garden Green
To make the double vision technique, cut the stencilled panel into 2cm strips and alternate glueing one strip, then using foam pads for the next.

3. HELLO FRIEND


Card base Strawberry Slush - 14.8 x 21 cm, folded at 10.5cm
Flirty Flamingo Panel - 13.8 x 9.5cm
Stencilled Panel - 13.3 x 9 cm
Colours of ink used - Barely Blush, Pretty In Pink, Flirty Flamingo, Strawberry Slush
I die cut a sentiment from the panel and then 3 others in plain white and layered them all up and popped it back into the card.  I added a small sentiment in Strawberry Slush Ink and popped it up on foam pads.

I thoroughly enjoyed the process of working out the best colour combinations and the best layering technique - lighter first works the best.

Whatever you are doing today, be bold and have a play!


Tuesday, 12 May 2026

Fun Times

On Saturday 9th May I ran my first ever big craft session with Bev from Uniko Ltd. She's a pro at these, so I couldn't have been happier to have her share this session with me. We called it the Uniko and Stampin' Up! Mash Up - two companies, two friends coming together to share a mutual love of crafting with other crafty ladies.

We had 8 projects for our 8 attendees to take part in and I was pleased to see them getting stuck into almost all of them.

I'm really enjoying scrapbooking at the moment as you'll know if you follow me on Instagram. I can't get enough of it. Keeping those memories of those experiences in hard copy rather than on my phone is a real joy. I can flick through my folder and smile.

Of course I had to include one in my projects, and while only a couple of the ladies at the event did them, it won't stop me from including them again in future events - check out my Events page for all the events I have planned in.

I keep them simple because well, I don't really have time or brain space to think about very complicated ones. I also love using the Party Alphabet dies and stencils to make them stand out.

For this one I used Bev's Balloon Bash Stencils, the In Colors for 2025-7 Strawberry Slush, Darling Duckling and Cloud Cover and those nice big Party Alphabet letters to create something bold and memorable, but also simple.

Keeping it simple doesn't mean it's not worth doing, you don't have to overcomplicate your makes, In fact I find it makes me able to do more in the little time I have.

Keep it simple, and you can get more crafts into your day!

Monday, 20 April 2026

Core Memories...

Everybody needs a friend like Justine. I've known her for 25 years and we first met through a friend of mine (Kathleen) who I'd known at Glasgow University and who had moved to Oxford University to do a PhD (I know a lot of smart friends!). She had met Justine as they were studying in similar fields (Classics, it's not a very big world) and as I was working at the University in one of the libraries, she introduced me. 


Like a lot of friendships over the years we've flitted in and out of each other's lives, but this past year or so, we've been back in touch more regularly, and she's popped in to see me in Leeds on her way back further up north, when this photo was taken last October. 

This was one memory I was definitely going to be keeping and so this page was born. As it happens, I've met up with Kathleen early this year in Oxford and so this will eventually become a double page spread.

I've been making good use of the Party Alphabet dies on my pages lately, and stencils from Uniko - this one is the Layering Retro Lines - along with the new ink colours for 2026-8, which I absolutely love, not just for their colours, but because they are now the magnetic closures which makes my life a whole lot easier in opening them.


This year is definitely becoming the year of reconnecting with friends. I have a trip planned to Dublin later on in the year with some other friends I lost touch with, and I will definitely be keeping those memories too.

Justine is definitely one of a kind. A kind, wild, helpful, intelligent and thoughtful person, who has faced challenges and overcome them. I'm very glad that she's in my life, and I am definitely the better for it.

Keep those memories of your friends, they deserve to be remembered.


Sunday, 24 February 2019

Uniko Stencil Sunday

I'm back with another GD post for Uniko's Stencil Sunday spot and this time I've decided to get at least one card ready for Christmas. I always always struggle with Christmas cards. I need so many, so when I saw the Let It Snow stencil in the gift pack Bev sent me, I knew it would give me a quick, easy and effective way to get at least one under my belt!


I took a card blank and masked off the edges. I then took the two shades of blue Distress Oxides that I have in my stash (I feel I need more of these!) and started blending the darker (Blueprint Sketch) on the top of the card, before adding Mermaid Lagoon to the bottom. I blended until I got a smooth blend where they met, sort of half way and sort of at an angle.

I then placed the stencil on top and with a lightly damp cloth, I dabbed it through to remove some of the colour. It spreads a bit under the stencil, but I never mind this as I think it gives the impression of melting - at least with this stencil.

I kept the stencil on and with some white pigment ink dabbed it through as well on top, to give the snowflakes a bit more definition.


A few sequins and a very simple sentiment popped up on foam tape and that is my first Christmas card done. Definitely one to try again - maybe in different colours? 

Thank you so much to Bev for having me all through this month and thank you for joining me! Happy Crafting Everyone!

Monday, 11 February 2019

Uniko February Release Day Blog Hop and Treasure Hunt

I feel a little like Buddy the Elf today. I want to shout 'Uniko's coming, Uniko! I know her, I know her!' because today is RELEASE DAY! And you can get all the lovely products that myself and Bev and all the amazing design team have been showing you all week.


Today is a fabulous blog hop and Treasure Hunt. A little more sedate than Anneka Rice (just aged myself there!!), but just as exciting. 

The rules of the Treasure Hunt are:

1. Comment along the Blog Hop and find the icons
2. Email bev@uniko.co.uk with the following information:
  • Design Team Member's Name & Balloon letter found 
  • What the Balloons spell out
Entries should be emailed no later than Thursday 28th February 2019, for the winner to be announced Friday 1st March 2019.

And the prize?? The ENTIRE 7th Birthday February Release - Amazing!! That's 6 clear stamp sets, 2 co-ordinating designer dies collections and 1 stencil design. 

Now that's worth entering! And not only that, but Bev will also be drawing a random comment from the hop to win a £25 clear stamp prize package. Clearly Bev is well and truly in birthday mode!

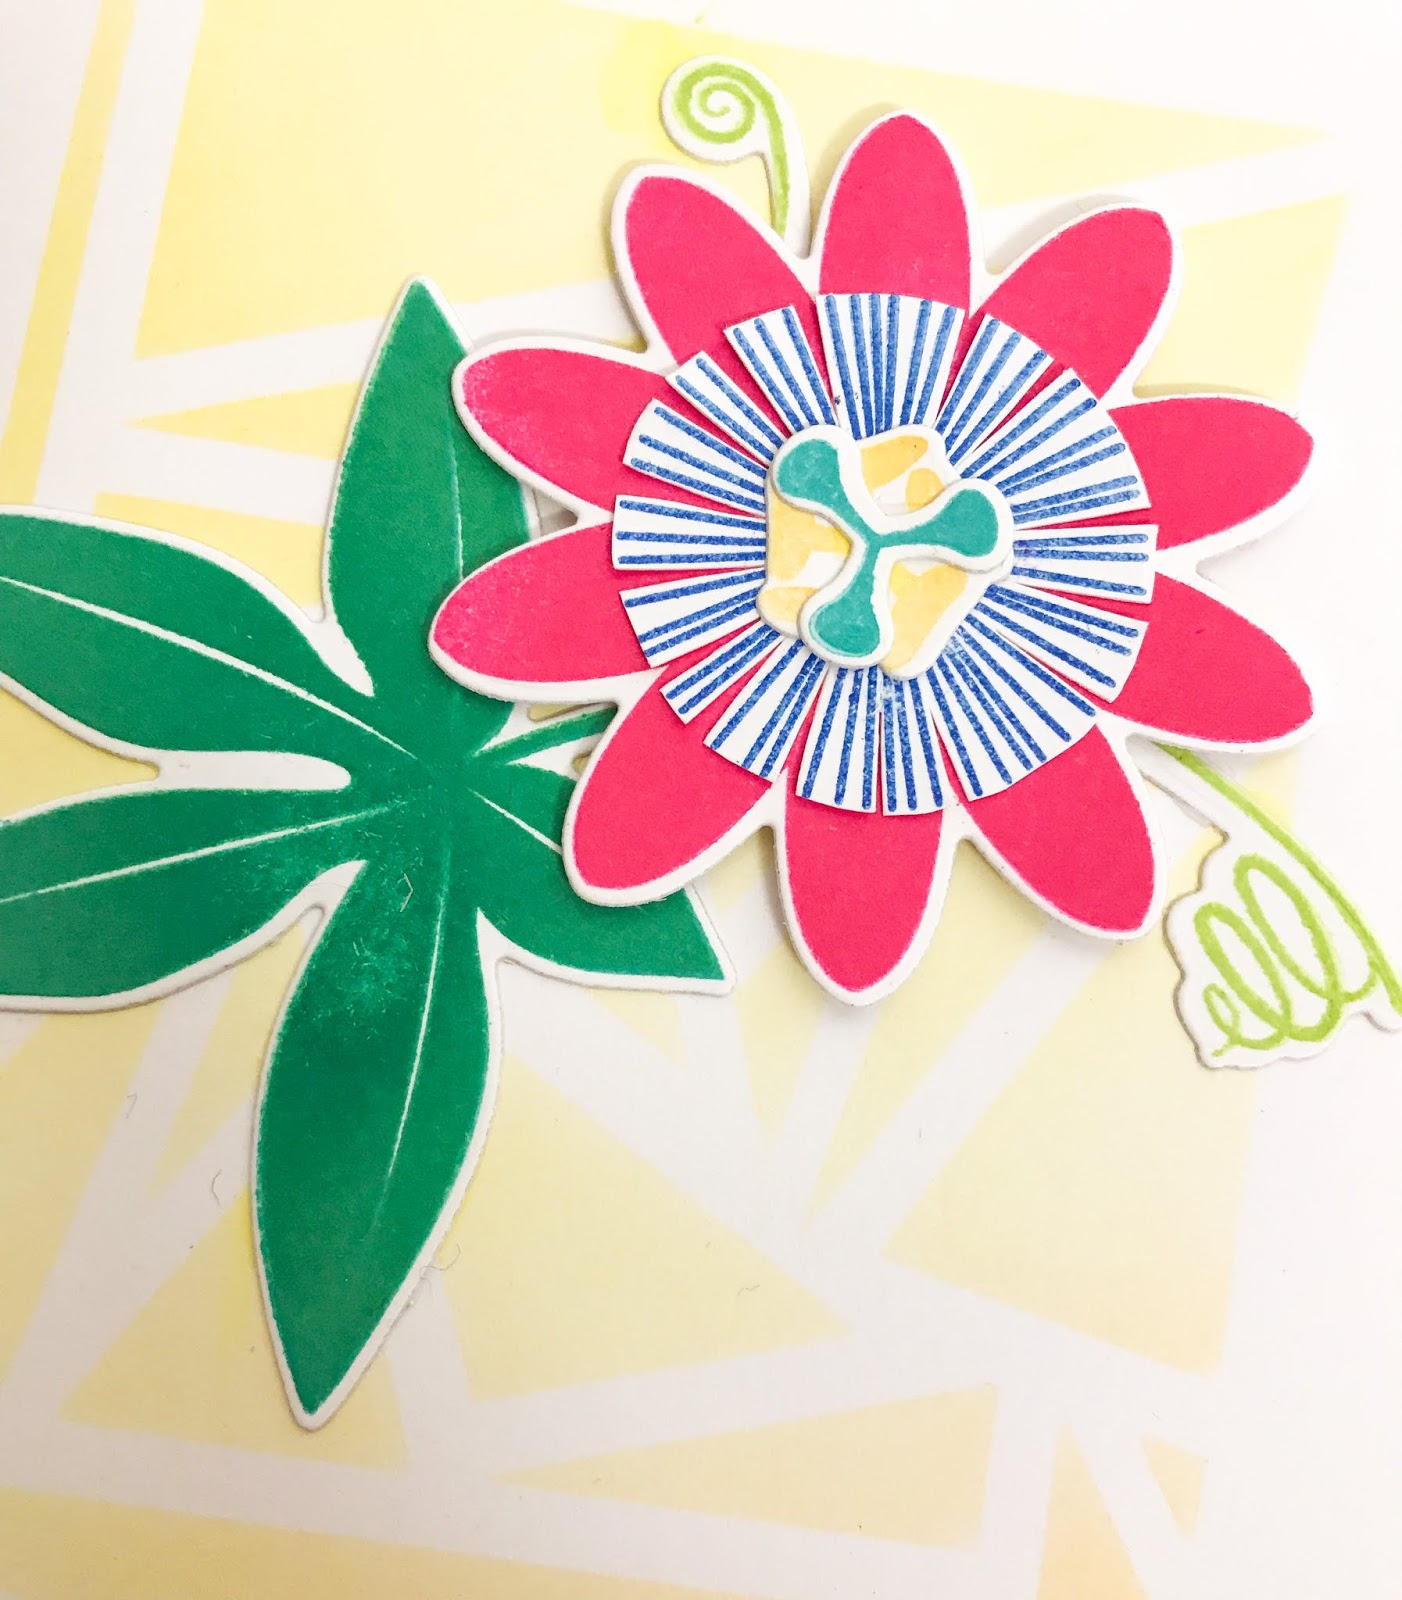
For my card, I couldn't resist using that glorious Passiflora again. This time I stamped the outline image onto Copic friendly cardstock with Memento London Fog. I then added in details in different Memento inks and coloured the leaves with different shades of B and BV Copic markers.


I stamped the tendrils with some green, teal and grey Memento ink and cut all the images with the coordinating dies.

I could not resist using that abstract triangle stencil again - it's third outing this release, so you can tell how much I love it! - and did some very soft blending in the corner (again inspired by Lisa's post!) in greys.


I added the flowers to the top of the card and the sentiment to the bottom on top of the stencilling.

Next on the hop is Carol! Happy hopping, and good luck!

Sunday, 10 February 2019

Uniko February Release - Intro Background Blocks Pinstripe and Yes, You Release Freebie

This is the last day of the release sneak peeks and I'm so glad I could be here as GD to share them all with you. I've had a great time!

Today I'm sharing this rather quirky stamp set called Background Blocks Pinstripe. As soon as I saw this set, I immediately thought of tartan - can't get away from the fact I'm Scottish! - and with my stamping tool I set to work to create a criss cross background by turning my card base and moving it up and down.


I used a lot of different colours of my little Memento Dew Drop inks. I have a small collection and used most of the brightest colours for as rainbow an effect as possible. As you'd expect, it ended up fairly dark in the centre with the colours showing at the edges, but I love the way it turned out.


I used the Yes, You set (this is added to release day orders of £25 or more up to Sunday 17th Feb 9pm GMT or while stocks last. After that you can buy for £5) to stamp out several of the words in bold colours which I attached randomly with foam tape. The little Yes, You in the corner then links to the inside of the card where I've stamped you are loved. A great way to remind people that we are there for them!


Thank you so much for joining me for all the sneak peeks. I will be back tomorrow for the blog hop at 9am - definitely worth joining in for a fabulous prize! Happy Crafting Everyone!

Saturday, 9 February 2019

Uniko February Release - Passiflora

Welcome back to Day 4 of the Uniko February Release. Today we are introducing a floral set called Passiflora. We had one of these flowers in our garden in Scotland, that amazingly my mother grew from a seed. It's a climber with little tendrils and I can remember seeing it curling round the branches of the dead plum tree we had at the very back of the garden. It flowered every year and one year we had a fruit. It never really ripened though, but we enjoyed disecting it!


There are so many elements to this and you can build up layers by stamping. There's also an outline that you can colour in too. I've gone very much off the natural colours and built up my plant with bright colours from my Ranger Dye Ink sets that haven't seen much of the light of day for a long time. They are so bold though that they were perfect for this set.

I masked off a background area on the card base and used some yellow and orange distress inks with the Abstract Triangle stencil (see Tuesday's post) to create the background.

I then stamped all the separate elements of the flower and die cut them out. It was then just a case of building up the flower in the corner. I will admit I had to look at a picture just to check my memory was correct where all the different bits went!


A sentiment from the set in the bottom corner finished the card off nicely. I think this is my favourite from the release so far!

Tomorrow I'll be sharing the last new set and then tune in on release day on 11th for the blog hop and a fun way to win the entire release!

Happy Crafting Everyone!

Friday, 8 February 2019

Uniko February Release - Intro Background Blocks Graffiti Texture

Here we are on Day 3 already and I think you can probably tell just how much fun I've been having with the Uniko February release so far. Today it is the turn of a quirky small background stamp called Graffiti Texture:


This has a grungy and mixed media look to it, and it's something I would never have picked up, but I had a lot of fun with it. It's great for texture - like the name suggests!


I thought with Valentine's Day coming up, I might as well get a little romantic with this set. I took the graffiti texture block and stamped it onto various shades of cardstock with some Versa Mark ink. I then took some clear embossing powder and heat set it. I had an MFT heart die in my stash and cut out one from each piece of stamped cardstock. 

I felt it would look too CAS on a card blank on its own, so I added some dry embossing with another MFT rectangle frame die I have that doesn't get much use, but was perfect for this - it's been used 4 other times now too!

Using my stamping tool, I then stamped the sentiment above and below where the heart would be and stamped in VersaFine Onyx Black.


I added a little detail on the inside with some of the smaller images from the So Much Clear Stamp Set (I get a lot of use from this little set, I love it!) and that was it. 


Not long to go now until release day on Monday 11th and a fabulous giveaway. Hope you're enjoying all the intros from all the team!

Thursday, 7 February 2019

Uniko February Release - Intro Stencil Abstract Triangles & Birthday Wishes

Here I am again with another sneak peek and a card for Day 2 of the Uniko February Release. Today we are sharing a new stencil and a new very useful birthday sentiment stamp set.


I love Uniko stencils and I particularly like this one for its quirky design. It's called Abstract Triangles. I masked the stencil to give a border on a white card base and then did some simple ink blending through it in sunset colours (Picked Raspberry, Spiced Pumpkin and Mustard Seed).


I found some raspberry pink card stock in my stash and stamped and heat embossed the sentiment onto it with some Versa Mark ink and Wow! Bright White Fine embossing powder. I then trimmed this into a panel and used a We R Memory Keepers corner chomper on the edges. I wasn't sure about this as the abstract panel is very angular and the sentiment had very rounded edges, but the next day I really liked it!

I simply added the sentiment on top with some foam pads.


How are you all enjoying the release so far? I'm enjoying sharing all my makes. Please stop by all the DT members and Bev to see what they've created too.

I'll be back tomorrow with another card. Happy Crafting Everyone!

Wednesday, 6 February 2019

Uniko February Release - Intro Big & Bold Happy

I am delighted to be back as GD for Uniko, most especially as it is their 7th Birthday. For any company to get to 7 years is a huge achievement, and most especially for a small company. My hat is off to Bev and all that she does. Having started a small business last year, it's hard, hard, hard, hard work, but so rewarding!


Today we are introducing Big & Bold Happy, a stamp set with coordinating dies:


I've used the dies that coordinate with the stamp set to add some big & bold writing to this birthday card.


I've die cut the happy word from some scrap cardstock in shiny dark blue and the bigger outline in vellum to add contrast.

The balloon bash stencil was ideal to add something into the corner of the card and I used some distress oxide in mermaid lagoon. The seeing stars stencil I added on top again in mermaid lagoon oxide ink and as it was a second layer, it looks darker - a tip I got from a blog post of Lisa's.
 

The die is so bold and eye catching, it didn't need anything else on it other than the word birthday. Such a useful and quick and easy set - another card for my stash!

Stick around for more sneak peeks this week and definitely release day on 11th. There's a fab blog hop and an amazing prize! Happy crafting everyone!


Sunday, 3 February 2019

Stencil Sunday - Uniko Guest Design

I am absolutely delighted to be guest designing for Uniko who have a new feature called Stencil Sunday. I love Uniko and I especially love their stencils - great price, great quality.

Bev very kindly sent me a few stencils to add to my collection and I'm using the Natures Treasures II set with these beautiful leaves. You also get the negative and the positive which means even more options, but here I'm just using the negative.


All I did was take a blank white card base, and very carefully holding my stencil in place, blended some distress ink through the stencil. It's easier if you use a sweeping motion almost as if it's a blending brush. I didn't even tape it down with masking tape as no matter what I do, I end up tearing the card. I did one in each corner of one colour, and the other in the other corner in another - Mowed Lawn and Evergreen Bough.


Then all I did after that was stamp the sentiment in Versafine Onyx Black and Distress Oxide Lucky Clover.  Done!

With not getting much time for card making in between running a business, stencils can make beautiful and simple cards so easily. Indeed a friend recently said to me how much she loves my latest cards because they are so simple!

Thank you for having me Bev and thank you all for reading. I will be back this month with more Uniko goodies - release week is coming up and I shall be joining in. So excited to share! It's really got my mojo going again. Happy Crafting Everyone!

Monday, 25 June 2018

Uniko Guest Design - Surprise Stencil Release - Bright Butterflies

I'm back with my third and final card to celebrate the launch of new stencils from Uniko. As you'll have noticed from previous posts, I've been really enjoying stencils lately and all that you can do with them. For my final card using the Bright Butterflies stencil I've kept it simple and one layer but managed to get a little bit of texture into it by embossing it.


You have to play around with the layers and the embossing mat, and you may need a shim - I just use an extra piece of scrap paper - to add a bit of extra pressure, but the embossed layer just lifts it that little bit.

I started with an A2 (US) card blank and I embossed on one side of it. Once embossed I kept the stencil on top and using my ink dusters, blended some distress inks over the butterflies and flowers. I used lighter pastel shades like Spun Sugar, Antique Linen, Tumbled Glass and Wilted Violet.

Using my stamp platform, I used the sentiment from a Uniko Thank You set I got as a free gift in a previous order. I stamped each element individually using VersaFine Onyx Black, so I could get them as close as I could to each other.


Thank you so much to Uniko for having me and for their wonderful supplies. They are all available to purchase now in the shop.

I hope you've enjoyed the inspiration. Do pop by again soon! Happy Crafting!

Sunday, 24 June 2018

Uniko Guest Design - Surprise Stencil Release - Scattered Polka Hexagons

I'm back today to share my next card for the mini stencil release from Uniko. This one is the Scattered Polka Hexagons and I thought it would go perfectly with my last purchase from them, the Bee Happy set. I've been itching to ink this up and they go very well together.


It's been an age since I made a spinner and the sizes of the stamps just worked out perfectly. I started by inking a piece of yellow card stock using the stencil with some Wild Honey distress ink to get a tone on tone look.

I kept the middle of the card free from ink and using some Versa Mark ink stamped the heart from the stamp set. I then heat embossed with WOW! Gold glitter. I cut out my spinner element from the panel and before I realised it, I crumpled up and threw the cut out piece in the bin! Normally I keep it to place in the space so it looks more uniform and you don't get the white, but it worked out fine without it.

I then stamped the bee on some white card, fussy cut it and started assembling the pieces. I use my giant roll of 3M tape for the backing as I can cut it to size easily. I also use the MFT spin and slide discs which are light and small enough for tiny stamps like this. I glue one onto a circle of white cardstock with multi medium matte as it's strong and dries quickly. I then place it into the aperture and glue the stamp on top. It flows really well around. I have a video on spinner cards over on my You Tube channel.

I stamped the sentiment onto some black cardstock with Versa Mark ink and again embossed with the WOW! gold glitter powder. I added some vellum to the back so it wouldn't look so stark against the yellow.


The stencils are available now in the Uniko shop. Have any caught your eye? Thanks for popping by and Happy Crafting!

Saturday, 23 June 2018

Uniko Guest Design - Surprise Stencil Release - Mehndi Mandala - Blog Hop + VIDEO

Hi Everyone, I'm absolutely thrilled to have been asked to Guest Design for Uniko, a lovely UK based company who makes fabulous stamps and stencils. I have quite a few of their stencils already, so to be asked to use more of them, of course it was an instant yes!

This is part of the blog hop to celebrate the release. You can start over at the Uniko blog, and I'll let you know who to hop onto next at the end of my post. This is the first of three cards made using three stencils. I have a video to go with this one showing you how I made 4 cards in 45 minutes using just one stencil.


You can watch the video here or over on my YT channel :)


I took a piece of A4 white card stock and cut it down to 11 inches as I always make my cards 5.5x4.25 (US A2 sized). I then marked out the middle point so I would know where to place the middle of my stencil.

I placed my stencil in the middle and started blending with very gentle ink blending in Spun Sugar. It's quite light, so I built up the layers gradually. I then put the stencil on top and added Picked Raspberry for some contrast. 

I removed the stencil and then cut the panels to size to fit my card blanks. I picked two different pink colours to fit with the pink on the stencil and background. I then attached them with foam tape on top. I'd like to give credit to my friend Lisa Tilson of My Card Trip whose card I saw using the slightly off set mounting of the panel. It gave me the main idea for this set. I thought a few sequins in pink and clear would be a nice addition.


This is such a gorgeous stencil, and I hope this inspires you to try some stencilling. The new release is available now over on the Uniko website and you can carry on in the hop by visiting Beverly Brown, Uniko's esteemed creator.

I'll be back tomorrow with more. Happy Crafting!

Monday, 11 December 2017

5 cards, 1 stamp set - Uniko - VIDEO

Hi Everyone. So in my last post, I was a bit smug and said I felt like I was on top of things - not any more. I'm moving into panic mode now as I try to work out if I have enough Christmas cards. The answer was no, so I got out the fabulous Block Party Christmas stamp set from Uniko and had a good play for well over an hour.

The result is 5 cards from 1 set - and you could easily do lots of multiples with this set - and a video showing all the different types. 


I always say that if I get 5 cards out of one stamp set it's been well used (I'm working through my NBUS, I promise!), so this has been well used indeed.

1. Copic Colouring


2. One colour stamping


3. Emboss resist
 

4. Stencil Overlay (Distress Oxides)


5. Paper Piecing
 

Hoping you are all getting on well with Christmas prep - I have ordered the chicken from the butchers, so we are good to go there.

I'm linking this up to the Uniko challenge for this month, #44, which is Christmas.


Also Pixie's Snippets Playground weeks 311 and 312 as I used a lot of scrap white card (salvaged from cards that didn't make it) and patterned paper scraps. 


Happy crafting everyone!

Blog design by aleelilydesigns