Saturday, 22 August 2015

What I've been up to and some flowery notelets

Hello Crafty Friends, here I am back from our short holiday.

It's funny not having blogged for a couple of weeks. I rather missed it, but it has been nice to return from holiday a little bit more refreshed, having made use of grandparents and sister for some baby sitting. It's a win-win situation for all involved! 

I managed a bit of colouring and got into the groove of drawing lines over at Kathy Racoosin's Pop Up Colouring Challenge. Here are my attempts:

Pre-Challenge Day - 13th August- Pitt Artist Pen and Zig Clean Color Brushes
 Day 1 - 14th August - Pitt Artist Pen and Zig Clean Color Brushes
Day 3 - 16th August - Help from Anne with Spectrum Aqua Markers
Day 4 - 17th August - Stabilo Fine Line .88 tip


I rather like the result of the boat on the ocean and the abstract railway lines/ladders, so I may frame them for the craft room.

Keep checking IG and The Daily Marker for more details of the upcoming 30 Day Colouring Challenge in October.

So, what else did I get up to crafty wise on holiday. Not a huge amount other than the challenge, as I tried not to take too many supplies, but when you're on holiday and you don't have children running around you, you tend to buy things....

I bought a new camera. A Nikon P530. It's a refurbished model that I found in a camera shop in Ayr. A friend of mine has since told me it's a good model to start with, and it has taken some nice pictures so far. Now to think about editing software!

I enrolled in an Online Card Class. It's the Copic Markers for Card Makers. It's going to take me some time to get round to doing any of the sessions given small children, but I love that I can dip in and out. I also need to think about which markers to buy, as I finally understand the numbering system!

I also bought a new printer. I decided it was time to get one that would also be good for crafty downloads and pictures - it definitely helps with the card class. It's the Canon PIXMA MG6450 - ours is white. It has WiFi connectivity - I feel dead modern!

The die set I'd been waiting on from Simon Says Stamp came back in stock, so I did a bit of an order to them too..... I'll share with you over on Instagram when they arrive. If you're not on IG, and you are a crafter, think about joining. It's a lovely crafty community.

And I finally got round to finishing off a commission from my mother in law for some more notelets. This time it's a set of 6 3.5x3.5 inch cards, with images from my favourite CB stamp set heat embossed and coloured using pencils. I went the whole hog and made a little box for them using my WRMK Envelope Punch board - it took me several attempts, but I finally did it! 


[Supplies: CB Miniature Florals stamp set; Kraft pre-cut card blanks; Versa Mark Ink Pad; WOW! Bright White Embossing Powder; Derwent Artists Pencils; Bazzill Basics 12x12 card; WRMK Envelope Punch Board; Double-sided tape; Docrafts Papermania Heat Tool; Anti-static Pad]

So there you are, a round up of what's been going on craft wise in the past couple of weeks. 

Thank you as always for reading and any comments you may leave. It really makes my day! Happy Crafting!

Monday, 10 August 2015

Pop Up Colouring Challenge 14th-17th August

Hi Crafty Folks! So we're still on holiday, but I had to pop on and let you know about Kathy's Pop Up Colouring Challenge. It's on from 14th-17th August and is to keep us all going as we prepare for the full colouring challenge in October.

Check out Kathy's blog post all about it:

http://www.thedailymarker.com/2015/08/its-two-challenges-giveaway/

Best place to check it out is on Instagram and you can follow Kathy at @kathyrac. It's a great chance to start colouring if you're new to it, and just spend some time with friends scribbling - you do not have to be an expert! It's all about learning and having fun.

One child is asleep, the other is resisting, so I had better sign off and see what is going on :)

See you all at the weekend, get those coloured pencils dusted off!

Friday, 7 August 2015

Shell-abrate

Happy Friday, Crafty Friends! So we're up in Scotland on holiday and I find it's hard to have a day go by without crafting something now, but it has been nice having a break from the usual routine and seeing family and friends. 

Onto my card! I made this a couple of weeks ago using my current favourite stamp set, Newton's Nook In Slow Motion. When this set was released, I saw a fabulous card by Taheerah Atchia on their blog which had used loads of masking using the little envelope stamps. I thought I'd have a try and make a birthday card for a friend.


Supplies: Newton's Nook In Slow Motion Stamp Set; Ranger Dye Inks; Various Copic Ciaos; Lawn Fawn Let's Polka 6x6 paper pad; Fun Foam; Post It Notes (for masking); Memento Tuxedo Black Ink; Double Sided Super Sticky Red tape

I really like how it turned out, especially the masking of the worm and the envelopes. I started by taking some Copic friendly paper and cut it to size (9x14.75cm) to fit across my card blank. I drew a light pencil line at 2.5cm so I had something solid to stamp on and the critters didn't go all wonky. I stamped the tortoise and then got to masking out my pile of letters. I used both little letters and stamped them 5 times on sticky post it note and cut them out and started stamping and masking, stamping and masking until I got the colourful little pile I wanted. Here's a little picture during the process. The paper at either side of the image is to protect it from smudges - a little late, as it got a couple of thumb prints on it before I put it down :(


I then masked the edge of the pile and also stamped a little party hat next to it and masked it off. I then stamped the worm as if he was peeping out of the pile of letters. Cute!

I then got to colouring with my Copics. I do really like these, and am trying to get in as much practice as possible, but I need to get a few more in green and blue. Once they were coloured in I stamped the sentiment in the corner and also trimmed the panel to get rid of the thumb prints. I then stuck some LF paper on the card base and attached the panel with fun foam and red tape. 


I'm amused by the results and hope you are too! As always, thanks for visiting, I really do appreciate it, and any comments you leave. Have a great weekend, as always!


Friday, 31 July 2015

In Slow Motion...

Hello there Craft Lovers! Another week, another blog post and I can't believe I've managed to keep this going for 6 months now. It seems very odd to think my first card was made in October and my first blog post at the start of February. In that time I've met some great people in blogland and on Instagram (it's a happy crafting place!), and have made quite a lot of crafty purchases, which in turn have made card recipients also very happy indeed. 

Enough of me, on to the cards. I did make quite a few crafty purchases this month, one of which was this adorable set In Slow Motion from Newton's Nook. I haven't bought anything from them before, but I have my eye on some more of their things. I'm loving this set and have used it to decorate an envelope, and also made several cards - including this post from a couple of weeks ago - Sloth-some

I was on a bit of a roll mid week when making these, and ended up doing three in one day - unheard of especially with both children around, but somehow I managed it!

The first I made in record time while baby was playing in her cot and 4 year old was watching TV - 20 minutes is a record for me!


Supplies: Free Balloon die from Simply Cards and Papercraft issue 139; Papermania Capsule Collection; Newton's Nook In Slow Motion Stamp Set; Clearly Besotted Best Birthday Stamp Set; Faber Castell Pitt Artist's Pen; Copic Ciaos; Ranger Multi Matte Medium

I had pre-cut the balloons, and just stamped the image onto the card base, as well as onto Copic friendly paper. I placed the balloons where I wanted them and using a Faber Castell Pitt Artist Pen added in the strings to the worm. I coloured in the worm, cut him out and stuck him onto the image using Multi Matte Medium, adding the string round his middle. The sentiment was stamped on the bottom and I hand drew the border, having seen it done to great effect by Julia Alterman in a recent video (Daydreaming with Inktense Pencils). That's it! So quick!

Later in the evening when the children were asleep, I made another two, this time using my new Derwent Inktense pencils. I fell in love with these when I first started blogging, but for some reason I never purchased a set. I now have the tin of all 72 and I still love them. Previous posts include Birthday Express and Birds on a Wire

Both cards were made in a similar way, stamping the images onto the card blank, then onto some Tim Holtz Water Colour Paper, and colouring with various Inktense pencils. I love colouring with these. I then fussy cut both out, and adhered them with foam tape, and drew my border in by hand again, then stamped the sentiment as shown.


His coat has been coloured in with the white Inktense pencil, but it didn't really show up, instead it gave it some interesting texture!


Supplies: Newton's Nook In Slow Motion Stamp Set; Derwent Inktense Pencils; Ranger Jet Black Archival Ink; Tim Holtz Distress Water Color Cardstock; Faber Castell Pitt Artist Pen;

I absolutely love these pencils and am so glad I finally got them. 

Thank you so much for reading as always, and have a brilliant weekend. We're finally off for a break next week, but I hope to still have time to share some a card with you while we're away.


Friday, 24 July 2015

Miniature Floral Notelets

Hello again, fellow crafters, how has your week gone? I can't believe we are well into July and I'm having to think about getting ready for heading off to Scotland to visit my parents and sister at the start of August. Be nice to get away - and into the sea for some chilly swimming!

A while ago I was commissioned by my mother in law for some cards, birthday and others. I've finally finished my commission with this lot of little notelets. I've been so taken with the Clearly Besotted miniature florals collection, I've been inking them up and colouring them in at every opportunity!


These were the panels I had created, each with three of the images stamped in Versamark onto half a piece of Tim Holtz water colour card stock, embossed with Wow! Bright white embossing powder and coloured in with various Spectrum Aquas. I did have one panel I coloured in using  my new Zig Clean Color Realbrush pens, but I'm not having a very happy time with them - I prefer my Aqua markers - and so I redid it.

It was simply a case of trimming the edges to fit across the front of a 4x4" card (cut down from my 6x6" pre-scored cards) and adhering them with fun foam covered in red tape.


As I didn't have any envelopes small enough, I got out my WRMK Envelope Punch Board and had fun making my own. I think they look really rather sweet as a set.


Supplies: Clearly Besotted Miniature Florals Stamp Collection; VersaMark Ink; Wow! Bright White embossing powder; Spectrum Aqua Markers - Floral, Primary, Essentials; WRMK Envelope Punch Board; Bazzill Basics card stock; Fun Foam; Red Tape; Pre-cut and scored card blanks

I'm pleased to say that my mother in law loves them and has commissioned another set. Hard work pays off!

Thank you so much for reading and following my crafty journey so far. Enjoy your weekend :)


Friday, 17 July 2015

Birthday Balloons

Hello craft addicts! I really wish all the stamp and craft companies would stop bringing out new dies and stamps every month - said no crafter EVER! That includes me! As I said last week I got some stamps and dies from the new Clearly Besotted release on 5th July. I've scraped out some time to use the fabulous birthday balloons that were designed by Stephanie's (CBs Head Honcho) daughter. They are fabulous and perfect for little ones, so I inked them up to make a couple of cards for my bestest buddy's little ones' birthday - the plural is correct, for there are indeed two!

She also asked me if I would do more of a step by step and as baby slept really really well when I was making them, I had some more time to take photos as I went. Hope it makes sense!

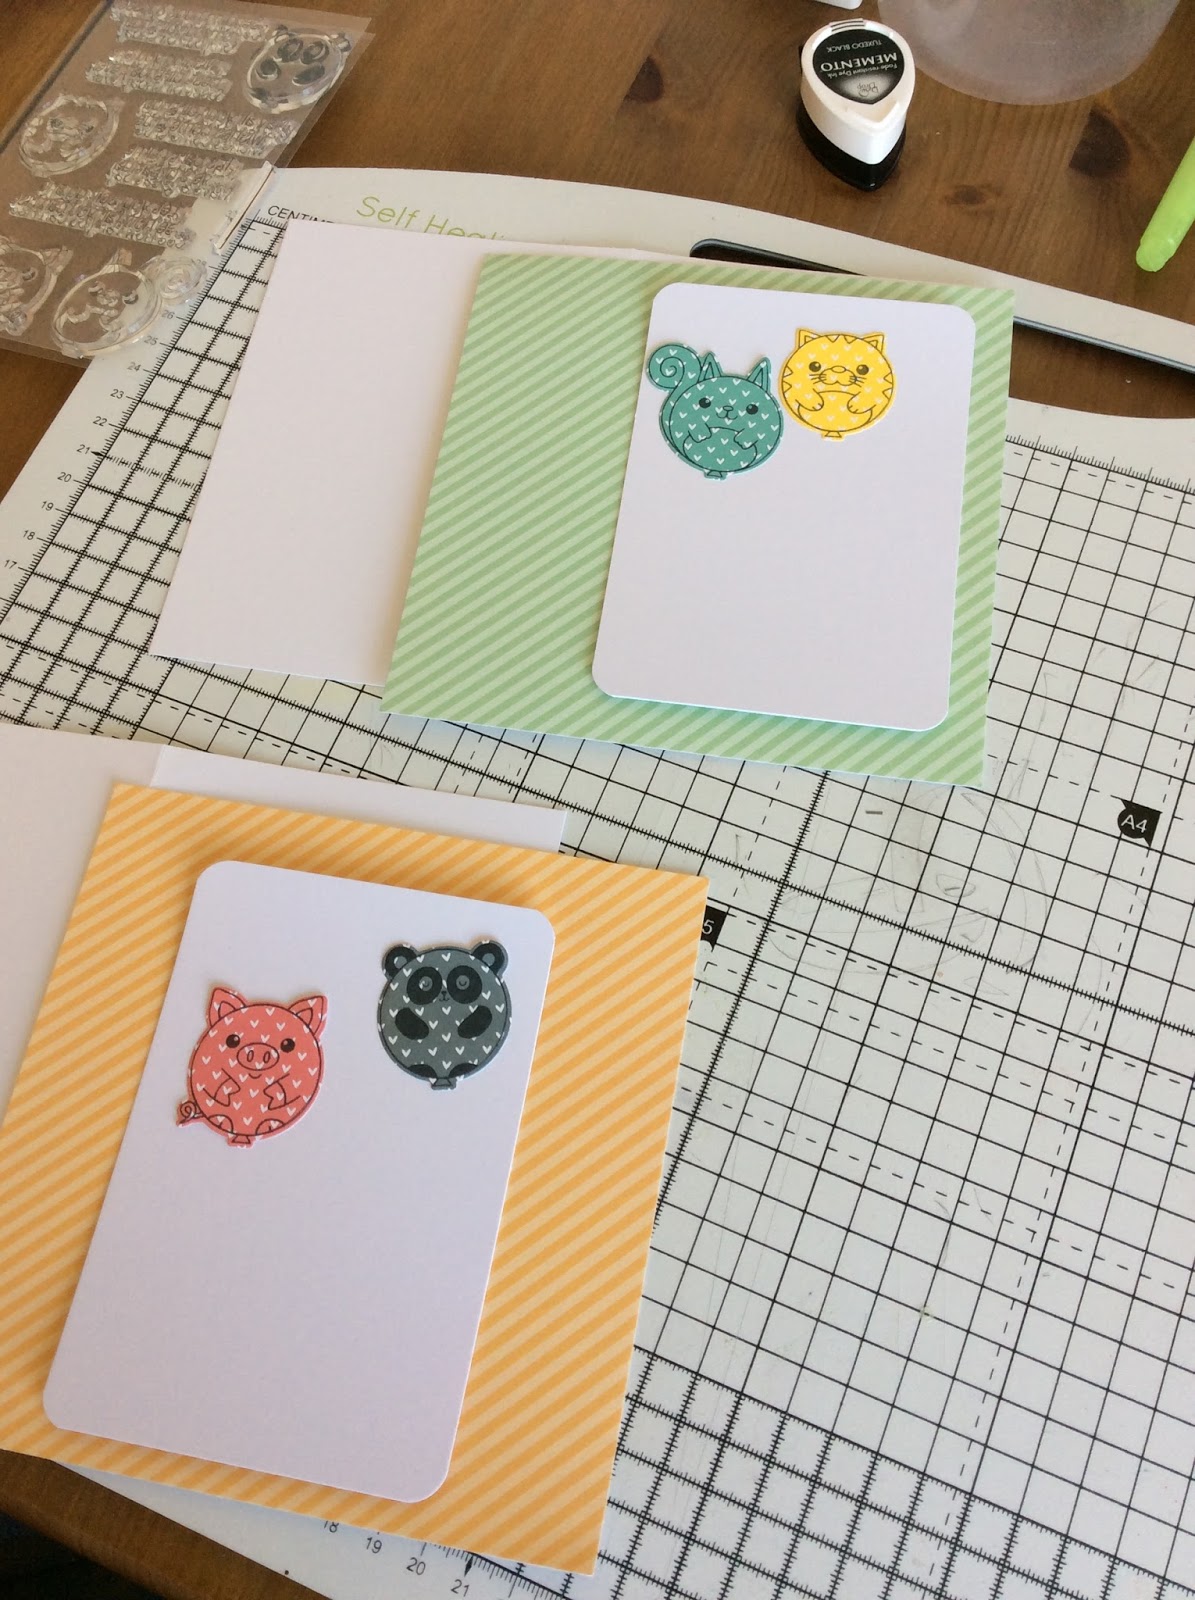
Step 1 - I wanted the cards to be bright and cheerful and as I don't have enough Copic Markers to colour the balloon animals as I would like, I chose to ink them onto some Lawn Fawn Let's Polka papers using Memento Tuxedo Black. It's a technique that Lucy Abrams uses with great effect.


Step 2 - I then took the matching dies and placed them round the stamped images and secured them with some Washi tape. 


Step 3 -  I die cut them out two at a time - I find I don't get enough pressure sometimes with smaller dies if I do too many at once, especially as the die cutting machine cuts best on the top left hand corner!


Step 4 - Once the pieces were die cut out, I trimmed some white card to a size slightly smaller than the pre-cut cards I use. I like 9x13cm, as the cards are 10.5x14.75cm in size.


Step 5 - I like the corners rounded sometimes, so as I don't have a corner rounder, I use the one on the WRMK Envelope Punch board! Works just fine for me at the moment :)


Step 6 - I wanted some nice paper as a background, so I chose some coordinating papers from the Lawn Fawn Let's Polka Mon Amie collection. I trimmed it to fit the front of my card blank, as it's a 6x6" pad.


Step 7 - I then used some double sided tape to stick it down on the card front. I would love an ATG tape dispenser, but that will be in November's Simon Says Stamp purchase!


Step 8 - There are some balloon strings in the stamp set, so I positioned the balloons and stamped the strings underneath, then with some more double sided tape stuck the balloons on top.


Step 9 - I wanted to add their names, so stamped them on the front underneath in some little letters I got in Hobbycraft.


Step 10 - I didn't want the sentiment on the outside as it would be too cluttered, so I stamped them on the inside.


Step 11 - I wanted a little bit of dimension, but it needed to be firm as it's going in the post to Europe, so I used some fun foam on the back of the panel. It's such a genius idea thanks Jennifer McGuire! Love how you can see my knees in this photo! It's so professional ;)


Step 12 - Done!


A better picture of the cards. Decided not to colour the words, as I liked the clean look.


Supplies: CB Best Birthday Stamps and Best Birthday Dies; Lawn Fawn Let's Polka and Let's Polka Mon Amie 6x6 paper pad; Memento Tuxedo Black Dye Ink Pad; Hobbycraft Outline Alphabet  

Well done on getting to the bottom of this post. Hope you found it helpful/interesting, and as always, have a great weekend!

Tuesday, 14 July 2015

Sloth-some

Hello! A post mid-week from me to get in to the Simon Says Stamp Wednesday Challenge - I think I have about 15 hours left! I saw it was Furry Friends and Newton's Nook and as part of my happy mail last week from Make the Day Special was my first set from them - In Slow Motion - I couldn't resist.

I love this set - I've already used it once to decorate an envelope! - so I thought I'd use the sloth - how can a sloth not be a furry friend?

[Supplies: Newton's Nook In Slow Motion; Lawn Fawn Large Stitched Square Lawn Cuts; Memento Tuxedo Black; Versa Magic Hint of Pesto; Ranger Dye Lily Pad; Memento Cottage Ivy; Derwent Artist's Pencils; Caran D'Ache Prismallo Aquarelles; Copic Ciaos]

I had to look up a picture of a sloth on the internet to work out its fur. I stamped the sloth a couple of times to try out what media to colour with. The final result was a strange mixture of Copics, water colour pencil and coloured pencils. The body was coloured in Copics (E57 with C2 on top), with white water colour pencil on the top; the face, claws and branch were then coloured using coloured pencils. 


Here's a little close up of the fur - I think it works quite well!


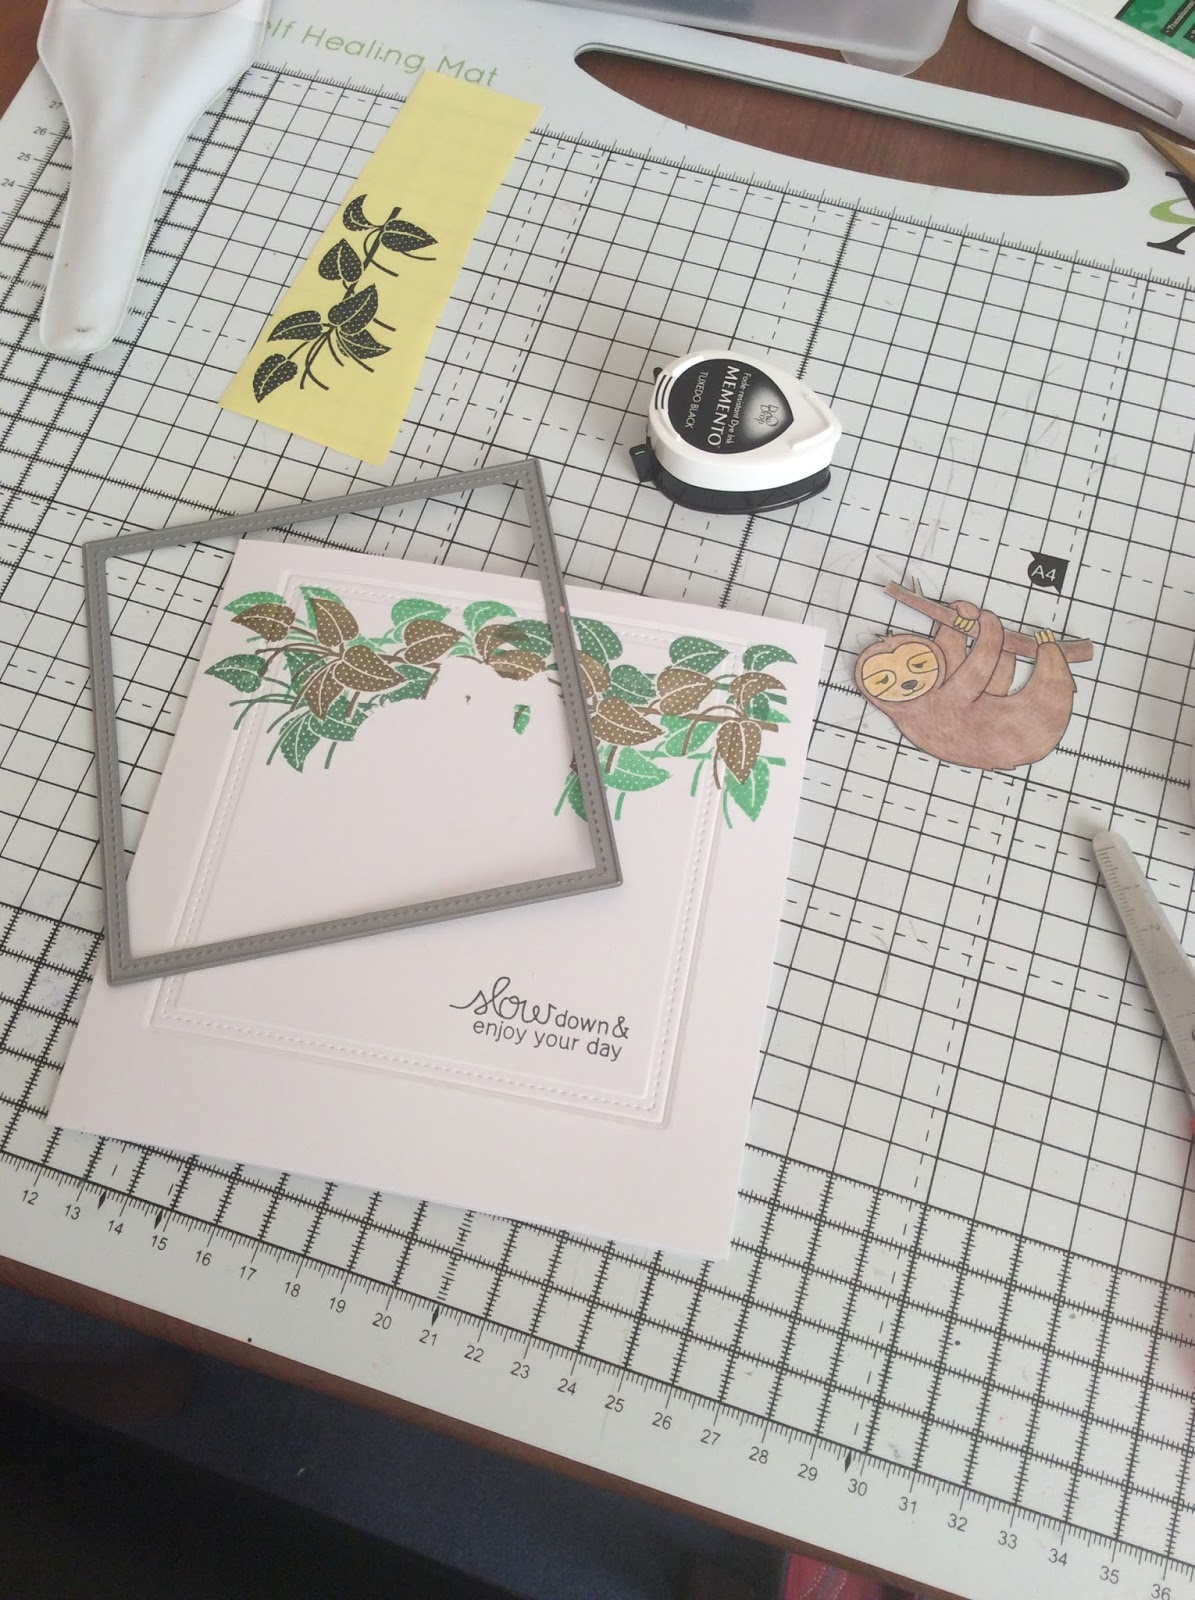
I then fussy cut him out. I also made a mask of the sloth and then the leaves on a post-it note and cut them out. 

I positioned the sloth post-it on the card and got to stamping the leaves with some of my greens - Versa Magic Hint of Pesto; Memento Cottage Ivy; Ranger Dye Lily Pad - and masking off the ones I wanted to stand out.


After removing the masks, I positioned where I wanted to emboss my stitched square around the sloth, and then stamped the sentiment on the inside. I then ran it through my Grand Calibur - I need to emboss my dies a lot more. I really like the results.


Normally I'd pop the cut out piece up on foam, but I decided I'd like a more one layer card - it's much cheaper on postage! - so just used some double sided tape.


I'm quite impressed I managed this today, but my 4 year old helped me by sharpening my pencils and doing a bit of colouring beside me while her sister had a long nap. 

Thanks so much for reading! Hope your week is going really well.
Blog design by aleelilydesigns